WPF Prism episode: 17 ~ IDialogService にコモンダイアログを求めるのは間違っているだろうか ~

再開した前回は Prism 7.2 から追加された IDialogService を利用してメッセージボックスを表示する方法を紹介しました。
今回は前回の補足として IDialogService で表示したダイアログからパラメータを受け取る方法と、Prism 7.2 でコモンダイアログを表示する方法を紹介します。
尚、この記事は Visual Studio 2019 Community Edition で .NET Framework 4.8 以上 と C# + Prism 7.2 + ReactiveProperty を使用して 、WPF アプリケーションを MVVM パターンで作成するのが目的で、C# での基本的なコーディング知識を持っている人が対象です。
IDialogService で表示したダイアログからダイアログ(メッセージボックス)を開く
episode: 16 のおさらいを兼ねて IDialogService で表示したダイアログウィンドウからメッセージボックス(ダイアログウィンドウ)を開く方法を紹介します。
表示するダイアログは episode: 14 で作成した BLEACH のキャラクターを選択するダイアログを流用します。
episod: 14 のソリューションから View をコピーして IDialogAware を実装する必要はありますが、大した修正も無くほとんどそのまま動作します。
src. 1 は IDialogAware を実装したダイアログからメッセージボックスを表示するサンプルです。
1 2 3 4 5 6 7 8 9 10 11 12 13 14 15 16 17 18 19 20 21 22 23 24 25 26 27 28 29 30 31 32 33 34 35 36 37 38 39 40 41 42 43 44 45 46 | using System; using System.Collections.ObjectModel; using System.Linq; using System.Reactive.Disposables; using Prism.Mvvm; using Prism.Services.Dialogs; using Reactive.Bindings; using Reactive.Bindings.Extensions; using WpfPrism72.Extensions; namespace WpfPrism72.ViewModels { /// <summary>BLEACHのキャラクターを選択するダイアログ。</summary> public class BleachDialogViewModel : BindableBase, IDialogAware { ~ 略 ~ /// <summary>ダイアログのClose要求</summary> public event Action<IDialogResult> RequestClose; ~ 略 ~ /// <summary>ダイアログのタイトルを取得します。</summary> public string Title => "BLEACH登場人物"; /// <summary>ダイアログがClose可能かを取得します。</summary> /// <returns>ダイアログがClose可能かを表すbool。</returns> public bool CanCloseDialog() => this.dialogService.ShowConfirmationMessage("画面を閉じてOK?") == ButtonResult.Yes; /// <summary>ダイアログが閉じた後の処理を実行します。</summary> public void OnDialogClosed() => this.disposables.Dispose(); /// <summary>ダイアログが開く時の処理を実行します。</summary> /// <param name="parameters">パラメータを表すIDialogParameters。</param> public void OnDialogOpened(IDialogParameters parameters) { } ~ 略 ~ private IDialogService dialogService = null; private CompositeDisposable disposables = new CompositeDisposable(); /// <summary>コンストラクタ。</summary> public BleachDialogViewModel(IDialogService dlgService) { this.dialogService = dlgService; ~ 略 ~ } } } |
episode: 16 で紹介した方法と同じくコンストラクタにインジェクションされる IDialogService からメッセージボックスを表示できるので、Window・UserControl どちらの VM の場合でも統一された方法でメッセージボックスやダイアログウィンドウを扱うことができます。
Prism 7.1 までの INotification + IInteractionRequest でもダイアログからメッセージボックスやダイアログウィンドウを開くことはできると思いますが、XAML への記述が不要になった分、簡単でシンプルになったと言えます。
ダイアログウィンドウの Close を中止する
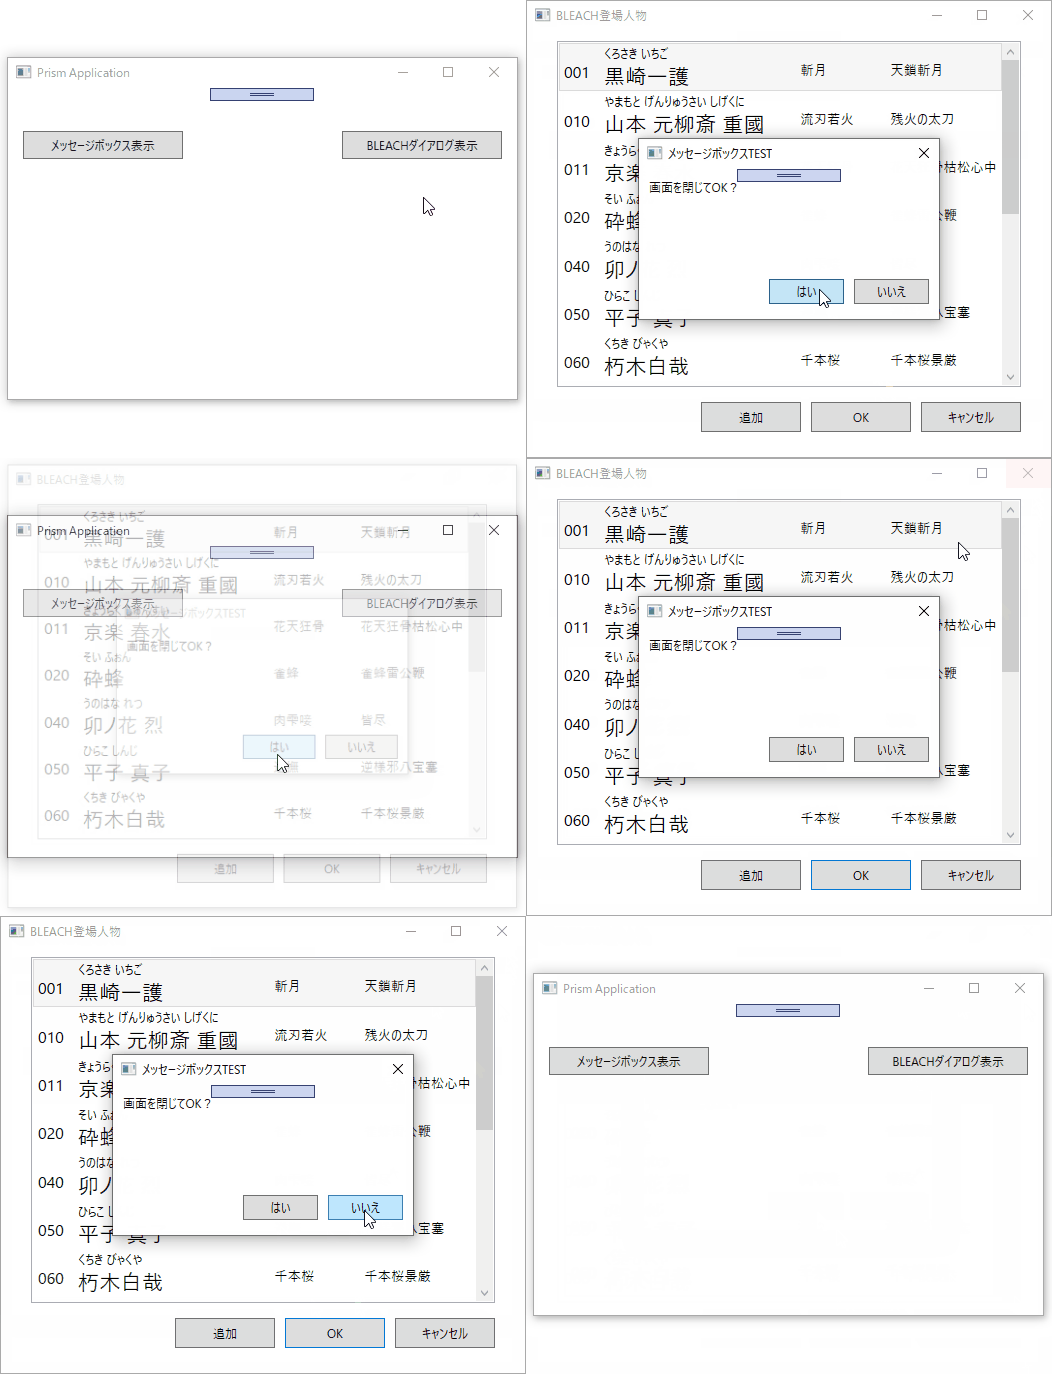
又、src. 1 のように IDialogAware.CanCloseDialog メソッド(イベント)でメッセージボックスを表示すると fig. 1 のようにダイアログウィンドウの Close をキャンセルすることができるようになりました。

fig.1 ダイアログウィンドウ Close のキャンセル
MVVM で Window Close をキャンセルする方法は今まで「これだっ!」的な方法を見た覚えが無いので、フレームワーク側で対応してくれたのは嬉しい限りです。
管理人の希望としてはダイアログウィンドウだけでなく Shell(MainWindow)にも Window Close のキャンセルを搭載して欲しいですが、残念ながら Shell には独自で実装するしかないようです。
OnDialogClosed でオブジェクトを後始末する
IDialogAware には CanCloseDialog(Closing イベント) だけでなく OnDialogClosed(Closed イベント)も定義されているので、ReactiveProperty のような Dispose したいオブジェクトの後始末を src. 1 の 29 ~ 30行目のように呼び出せるようになった事もメリットの 1 つだと思います。
ダイアログウィンドウからパラメータを受け取る
src. 1 で IDialogAware を実装したダイアログから呼出元へパラメータを返すには src. 2 のように OK ボタンの Command をバインドした okButton_Click メソッド内で RequestClose.Invoke のパラメータに設定することで可能になります。
1 2 3 4 5 6 7 8 9 10 11 12 13 14 15 16 17 18 19 20 21 22 23 24 25 26 27 28 29 30 31 32 33 34 35 36 37 38 39 40 41 42 43 44 | using System; using System.Collections.ObjectModel; using System.Linq; using System.Reactive.Disposables; using Prism.Mvvm; using Prism.Services.Dialogs; using Reactive.Bindings; using Reactive.Bindings.Extensions; using WpfPrism72.Extensions; namespace WpfPrism72.ViewModels { /// <summary>BLEACHのキャラクターを選択するダイアログ。</summary> public class BleachDialogViewModel : BindableBase, IDialogAware { ~ 略 ~ /// <summary>OKボタンのコマンド。</summary> public ReactiveCommand OkCommand { get; } ~ 略 ~ /// <summary>ダイアログのClose要求</summary> public event Action<IDialogResult> RequestClose; ~ 略 ~ /// <summary>OKボタンのClickイベントハンドラ。</summary> private void okButton_Click() { var param = new DialogParameters(); param.Add("SelectedItem", this.SelectedItem.Value.TargetCharacter); var ret = new DialogResult(ButtonResult.OK, param); this.RequestClose?.Invoke(ret); } ~ 略 ~ /// <summary>コンストラクタ。</summary> public BleachDialogViewModel(IDialogService dlgService) { this.dialogService = dlgService; ~ 略 ~ this.OkCommand = new ReactiveCommand() .WithSubscribe(() => this.okButton_Click()) .AddTo(this.disposables); ~ 略 ~ } } } |
episode: 16 で紹介したように、ダイアログに渡すパラメータが文字列のみであれば DialogParameters クラスのコンストラクタを【new DialogParameters($”Message={message}”);】のように記述するだけで済みますが、文字列以外のパラメータを受け渡しする場合には 26 ~ 27 行目のように DialogParameters を new して Add する必要があります。
パラメータの受け取り側は src. 3・26 行目のようにパラメータ設定時に指定した文字列型のキーを渡す事で受け取ることができます。
1 2 3 4 5 6 7 8 9 10 11 12 13 14 15 16 17 18 19 20 21 22 23 24 25 26 27 28 29 30 31 32 33 34 35 36 37 38 39 40 41 | using System; using System.Reactive.Disposables; using System.Reactive.Linq; using Prism.Mvvm; using Prism.Services.Dialogs; using Prism.Services.Dialogs.Extensions; using Reactive.Bindings; using Reactive.Bindings.Extensions; using WpfPrism72.CommonDialogs; using WpfPrism72.Extensions; namespace WpfPrism72.ViewModels { /// <summary>ShellのViewModelを表します。</summary> public class MainWindowViewModel : BindableBase { ~ 略 ~ /// <summary>BLEACHの登場人物選択ダイアログを表示します。</summary> public ReactiveCommand ShowBleachDialogCommand { get; } ~ 略 ~ /// <summary>BLEACHの登場人物選択ダイアログを表示します。</summary> private void showBleachDialog() { var ret = this.dlgService.ShowDialog("BleachDialog", null); if (ret.Result == ButtonResult.OK) this.character.Code.Value = ret.Parameters.GetValue<BleachCharacter>("SelectedItem").Code.Value; } ~ 略 ~ /// <summary>コンストラクタ。</summary> /// <param name="dialogService">Prismのダイアログサービスを表すIDialogService。</param> public MainWindowViewModel(IDialogService dialogService, ICommonDialogService comDlgService) { this.dlgService = dialogService; ~ 略 ~ this.ShowBleachDialogCommand = new ReactiveCommand() .WithSubscribe(() => this.showBleachDialog()) .AddTo(this.disposables); ~ 略 ~ } } } |
又、24 行目の ShowDialog メソッドは、別途作成した IDialogService 用の拡張メソッドです。
IDialogService 呼び出し用の汎用拡張メソッド
Prism の IDialogService は fig. 1 のようなモーダルダイアログだけでなく、モードレスダイアログを表示するインタフェースも兼ねているため戻り値をコーバックで受け取るようになっていますが、ダイアログを表示するならやはり Windows Form でもお馴染みの ShowDialog のように呼び出せるメソッドが使いやすいと思って汎用的に使える ShowDialog 用拡張メソッドを作成しました。
まずは、Prism Module テンプレートから『DialogExtensions』のような名前のプロジェクトを作成して、プロジェクトの既定の名前空間へ fig. 2 のように【Prism.Services.Dialogs】を設定します。
※ テンプレートから作成される View や VM は不要なので削除します。

fig.2 プロジェクトのプロパティ
そして、src. 4 のようなクラスを作成すると、src. 3 の 24 行目のようにダイアログを呼び出せるようになります。
1 2 3 4 5 6 7 8 9 10 11 12 13 14 15 16 17 18 19 20 21 22 23 24 25 26 27 | namespace Prism.Services.Dialogs.Extensions { /// <summary>IDialogService用拡張メソッドクラス。</summary> public static class IDialogServiceExtensions { /// <summary>モーダルダイアログを表示します。</summary> /// <param name="dlgService">対象のIDialogServiceを表します。</param> /// <param name="dialogViewName">表示するダイアログのView名を表す文字列。</param> /// <returns>ダイアログの戻り値を表すIDialogResult。</returns> public static IDialogResult ShowDialog(this IDialogService dlgService, string dialogViewName) => IDialogServiceExtensions.ShowDialog(dlgService, dialogViewName, null); /// <summary>モーダルダイアログを表示します。</summary> /// <param name="dlgService">対象のIDialogServiceを表します。</param> /// <param name="dialogViewName">表示するダイアログのView名を表す文字列。</param> /// <param name="parameters">ダイアログに渡すパラメータを表すIDialogParameters。</param> /// <returns>ダイアログの戻り値を表すIDialogResult。</returns> public static IDialogResult ShowDialog(this IDialogService dlgService, string dialogViewName, IDialogParameters parameters) { IDialogResult ret = null; dlgService.ShowDialog(dialogViewName, parameters, r => ret = r); return ret; } } } |
必須ではありませんが、このようなプロジェクトを 1 つ作成しておけばどんなプロジェクトへも使い回しができるので便利だと思います。
Prism でコモンダイアログを表示する
episode: 15 では Prism の IConfirmation を利用してコモンダイアログを表示する方法を紹介しましたが、Prism 7.2 以降から IConfirmation が廃止(非推奨)となり新たに IDialogService が導入されました。
それに併せて IDialogService からコモンダイアログを表示する方法を探すと Prism の GitHub Issues #1666 のやり取りの中で紹介されていました。
gojanpaolo さんが書かれたコードを丸ごと引用したのが src. 5 です。
1 2 3 4 5 | public class OpenFileDialogService : IOpenFileDialogService { private readonly OpenFileDialog _openFileDialog = new OpenFileDialog(); public bool? ShowDialog() => _openFileDialog.ShowDialog(); } |
コモンダイアログの表示に必要な記述は src. 5 が全てですが、episode: 16 のコメントでリクエストも頂いていたので管理人もサンプルを作ってみました。
コモンダイアログを呼び出す Service
まず、コモンダイアログ表示用のプロジェクトをソリューションへ追加します。
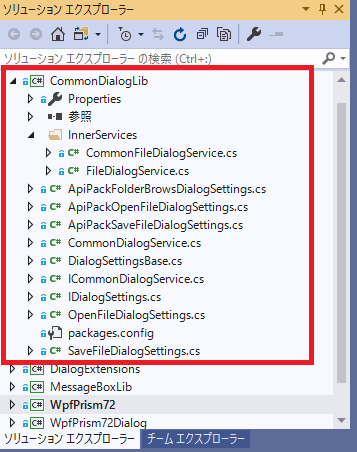
追加するのは Prism Module プロジェクトではなく普通のクラスライブラリプロジェクトから作成して fig. 3 のような構成を作成しました。

fig.3 CommonDialogLib プロジェクトの構成
管理人はものぐさなので 1 つのサービスで『ファイルを開くダイアログ』、『ファイルに名前を付けて保存ダイアログ』、『フォルダ選択ダイアログ』の 3 つとも表示するために fig. 3 のような構成にしました。
src. 6 は ICommonDialogService インタフェースと実装クラスの CommonDialogService です。
1 2 3 4 5 6 7 8 9 10 11 12 13 14 15 16 17 18 19 20 21 22 23 24 25 26 27 28 29 30 31 32 33 34 35 36 37 38 39 40 41 42 43 44 45 46 47 48 49 50 51 | using WpfPrism72.CommonDialogs.InnerServices; namespace WpfPrism72.CommonDialogs { /// <summary>コモンダイアログ表示用インタフェース</summary> public interface ICommonDialogService { /// <summary>コモンダイアログを表示します。</summary> /// <param name="settings">ダイアログと値を受け渡しするためのICommonDialogSettings。</param> /// <returns>trueが返るとOKボタン、falseが返るとキャンセルボタンが押されたことを表します。</returns> bool ShowDialog(ICommonDialogSettings settings); } /// <summary>コモンダイアログ表示用サービスクラスを表します。</summary> public class CommonDialogService : ICommonDialogService { /// <summary>コモンダイアログを表示します。</summary> /// <param name="settings">ダイアログと値を受け渡しするためのICommonDialogSettings。</param> /// <returns>trueが返るとOKボタン、falseが返るとキャンセルボタンが押されたことを表します。</returns> public bool ShowDialog(ICommonDialogSettings settings) { var service = this.createInnerService(settings); if (service == null) return false; return service.ShowDialog(settings); } /// <summary>表示するコモンダイアログサービスを生成します。</summary> /// <param name="settings">ダイアログと値を受け渡しするためのICommonDialogSettings。</param> /// <returns>表示するコモンダイアログサービスを表すICommonDialogService。</returns> private ICommonDialogService createInnerService(ICommonDialogSettings settings) { if (settings == null) return null; switch (settings) { case ApiPackFolderBrowsDialogSettings f: case ApiPackOpenFileDialogSettings o: case ApiPackSaveFileDialogSettings s: return new CommonFileDialogService(); case OpenFileDialogSettings o: case SaveFileDialogSettings s: return new FileDialogService(); default: return null; } } } } |
定義した ICommonDialogService もごくごく普通の C# 製インタフェースで、Prism の IDialogService の継承等も必要ありませんし、Prism を意識する必要は全く無いので好きなように作成できます。
※ 唯一、DIコンテナへの登録が必要であることを除きます
ボリュームもそこそこありますし、回りくどい書き方になっているかもしれませんが 1 度作成しておけば他の WPF プロジェクトへ使い回すことができるので無駄にはならないと思います。
Microsoft.Win32 名前空間のファイルを開く、ファイルに名前を付けて保存ダイアログを表示する
src. 7 は Microsoft.Win32 名前空間配下のファイルを開く、ファイルに名前を付けて保存ダイアログを表示するための FileDialogService です。
1 2 3 4 5 6 7 8 9 10 11 12 13 14 15 16 17 18 19 20 21 22 23 24 25 26 27 28 29 30 31 32 33 34 35 36 37 38 39 40 41 42 43 44 45 46 47 48 49 50 51 52 53 54 55 56 57 58 59 60 61 62 63 64 65 66 67 68 69 70 71 72 73 74 75 76 77 78 | using System.Linq; using Microsoft.Win32; namespace WpfPrism72.CommonDialogs.InnerServices { /// <summary>ファイルを開く、ファイルに名前を付けて保存ダイアログ用のサービスを表します。</summary> class FileDialogService : ICommonDialogService { /// <summary>コモンダイアログを表示します。</summary> /// <param name="settings">設定情報を表すIDialogSettings。</param> /// <returns>trueが返ると選択したファイル名、ユーザがキャンセルするとfalseが返ります。</returns> public bool ShowDialog(ICommonDialogSettings settings) { var dialog = this.createDialogService(settings); if (dialog == null) return false; var ret = dialog.ShowDialog(); if (ret.HasValue) { this.setReturnValues(dialog, settings); return ret.Value; } else { return false; } } /// <summary>表示するコモンダイアログを生成します。</summary> /// <param name="settings">設定情報を表すIDialogSettings。</param> /// <returns>生成したコモンダイアログを表すFileDialog。</returns> private FileDialog createDialogService(ICommonDialogSettings settings) { if (settings == null) return null; FileDialog dialog = null; if (settings is OpenFileDialogSettings) dialog = new OpenFileDialog(); else if (settings is SaveFileDialogSettings) dialog = new SaveFileDialog(); else return null; var saveSettings = settings as SaveFileDialogSettings; dialog.Filter = saveSettings.Filter; dialog.FilterIndex = saveSettings.FilterIndex; dialog.InitialDirectory = saveSettings.InitialDirectory; dialog.Title = saveSettings.Title; return dialog; } /// <summary>戻り値を設定します。</summary> /// <param name="dialog">表示したダイアログを表すFileDialog。</param> /// <param name="settings">設定情報を表すIDialogSettings。</param> private void setReturnValues(FileDialog dialog, ICommonDialogSettings settings) { switch (settings) { case OpenFileDialogSettings o: var openDialog = dialog as OpenFileDialog; o.FileName = openDialog.FileName; o.FileNames = openDialog.FileNames.ToList(); break; case SaveFileDialogSettings s: var saveDialog = dialog as SaveFileDialog; s.FileName = saveDialog.FileName; break; default: break; } } } } |
多少回りくどい書き方になっていると思いますが、コモンダイアログを ShowDialog して戻り値をパラメータへ再格納しているだけの単純なクラスです。
コモンダイアログ用 Service の使い方
このサービスを Prism の Module で使用するには src. 8 のように PrismApplication.RegisterTypes メソッドから DI コンテナへ登録することで可能になります。
※ プロジェクトの参照設定も必要です。
1 2 3 4 5 6 7 8 9 10 11 12 13 14 15 16 17 18 19 20 | using System.Windows; using Prism.Ioc; using Prism.Modularity; using WpfPrism72.CommonDialogs; using WpfPrism72.Views; namespace WpfPrism72 { /// <summary> /// Interaction logic for App.xaml /// </summary> public partial class App { /// <summary>DIコンテナへ型を登録します。</summary> /// <param name="containerRegistry">DIコンテナへの型を登録するIContainerRegistry</param> protected override void RegisterTypes(IContainerRegistry containerRegistry) => containerRegistry.RegisterSingleton<ICommonDialogService, CommonDialogService>(); ~ 略 ~ } } |
コモンダイアログの呼び出しは、src. 9 のようにコンストラクタへインジェクションされた ICommonDialogService の ShowDialog を使用します。
1 2 3 4 5 6 7 8 9 10 11 12 13 14 15 16 17 18 19 20 21 22 23 24 25 26 27 28 29 30 31 32 33 34 35 36 37 38 39 40 41 42 43 44 45 46 47 48 49 50 51 52 53 54 55 | using System; using System.Reactive.Disposables; using System.Reactive.Linq; using Prism.Mvvm; using Prism.Services.Dialogs; using Prism.Services.Dialogs.Extensions; using Reactive.Bindings; using Reactive.Bindings.Extensions; using WpfPrism72.CommonDialogs; using WpfPrism72.Extensions; namespace WpfPrism72.ViewModels { /// <summary>ShellのViewModelを表します。</summary> public class MainWindowViewModel : BindableBase { ~ 略 ~ /// <summary>OpenFileDialogから取得したフルパスを取得します。</summary> public ReactiveProperty<string> OpenFileName { get; } ~ 略 ~ /// <summary>Microsoft.Win32のダイアログを表示するボタンのCommandを取得します。</summary> public ReactiveCommand ShowOpenFileDialogCommand { get; } ~ 略 ~ /// <summary>Microsoft.Win32のダイアログを表示します。</summary> private void onShowOpenFileDialog() { var settings = new OpenFileDialogSettings() { Filter = "テキストファイル(*.txt)|*.txt|イメージファイル(*.jpg, *.jpeg, *.bmp, *.png)|*.jpg;*.jpeg;*.bmp;*png|すべてのファイル(*.*)|*.*" }; if (this.commonDialogService.ShowDialog(settings)) this.OpenFileName.Value = settings.FileName; } ~ 略 ~ /// <summary>コモンダイアログ表示サービスを表します。</summary> private ICommonDialogService commonDialogService = null; ~ 略 ~ /// <summary>コンストラクタ。</summary> /// <param name="dialogService">Prismのダイアログサービスを表すIDialogService。</param> public MainWindowViewModel(IDialogService dialogService, ICommonDialogService comDlgService) { this.dlgService = dialogService; this.commonDialogService = comDlgService; ~ 略 ~ this.ShowOpenFileDialogCommand = new ReactiveCommand() .WithSubscribe(() => this.onShowOpenFileDialog()) .AddTo(this.disposables); ~ 略 ~ this.OpenFileName = new ReactiveProperty<string>(string.Empty) .AddTo(this.disposables); ~ 略 ~ } } } |
ICommonDialogService は表示するコモンダイアログに対応した Settings クラスを ShowDialog のパラメータにセットする仕様なので、ここでは OpenFileDialogSettings を new しています。
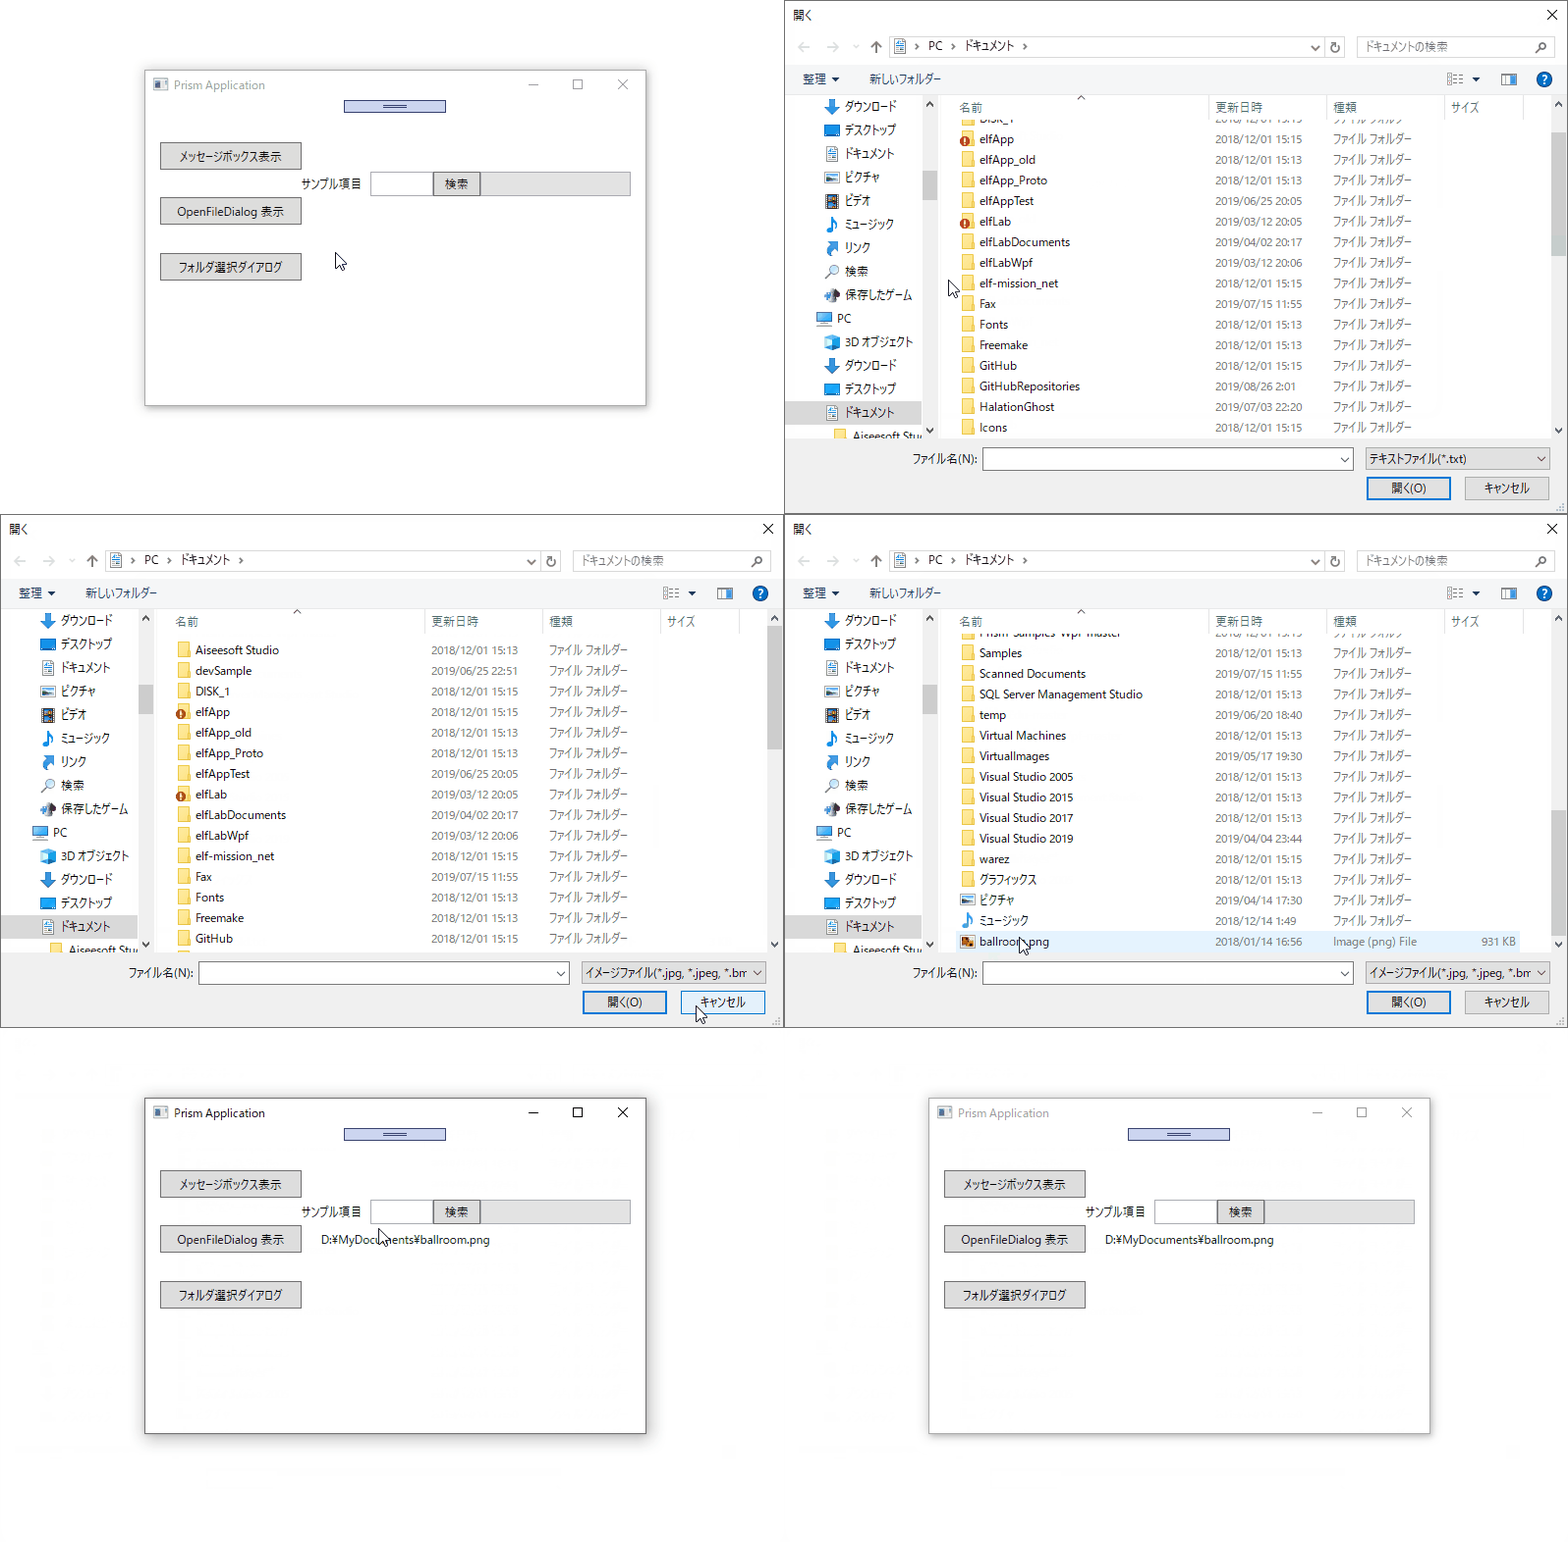
実際に実行すると fig. 4 のようにファイルを開くダイアログが表示されます。

fig.4 ファイルを開くダイアログを表示
ここで紹介したサンプルの構成が絶対的に正しいと言いたい訳ではありません。
コモンダイアログごとにサービスを作成する方が良い場合もあると思いますし、紹介した通りコモンダイアログの ShowDialog メソッドを呼び出しているだけの単純な C# クラスなので、適用するプロジェクトの都合や設計・作成者の好みで自由に作れば良いと思うので、参考の一つとして見てください。
Windows API Code Pack のフォルダ選択ダイアログを表示する
fig. 4 は Microsoft.Win32 名前空間の OpenFileDialog を表示していますが、src. 10 のように Windows API Code Pack に含まれる CommonFileDialog 表示用のサービスを作成すれば Visual Studio 2019 等でフォルダを選択する場合に表示される CommonFileDialog も表示できます。
1 2 3 4 5 6 7 8 9 10 11 12 13 14 15 16 17 18 19 20 21 22 23 24 25 26 27 28 29 30 31 32 33 34 35 36 37 38 39 40 41 42 43 44 45 46 47 48 49 50 51 52 53 54 55 56 57 58 59 60 61 62 63 64 65 66 67 68 69 70 71 72 73 74 75 76 77 78 79 80 81 82 83 84 85 86 87 88 89 90 91 92 93 94 95 96 97 98 99 100 101 102 103 | using System.Collections.Generic; using System.Linq; using Microsoft.WindowsAPICodePack.Dialogs; namespace WpfPrism72.CommonDialogs.InnerServices { /// <summary>Windows API Code PackのCommonFileDialogを表示します。</summary> class CommonFileDialogService : ICommonDialogService { /// <summary>コモンダイアログを表示します。</summary> /// <param name="settings">設定情報を表すIDialogSettings。</param> /// <returns>trueが返ると選択したファイル名、ユーザがキャンセルするとfalseが返ります。</returns> public bool ShowDialog(ICommonDialogSettings settings) { var dialog = this.createDialog(settings); if (dialog == null) return false; var ret = dialog.ShowDialog(); switch (ret) { case CommonFileDialogResult.None: case CommonFileDialogResult.Cancel: break; case CommonFileDialogResult.Ok: this.setReturnValues(dialog, settings); return true; } return false; } /// <summary>表示するコモンダイアログを生成します。</summary> /// <param name="settings">設定情報を表すIDialogSettings。</param> /// <returns>生成したコモンダイアログを表すCommonFileDialog。</returns> private CommonFileDialog createDialog(ICommonDialogSettings settings) { if (settings == null) return null; CommonFileDialog dialog = null; switch (settings) { case ApiPackFolderBrowsDialogSettings f: dialog = new CommonOpenFileDialog() { IsFolderPicker = true }; break; case ApiPackOpenFileDialogSettings o: dialog = new CommonOpenFileDialog(); break; case ApiPackSaveFileDialogSettings s: dialog = new CommonSaveFileDialog(); break; default: return null; } dialog.InitialDirectory = settings.InitialDirectory; dialog.Title = settings.Title; var filters = new List<CommonFileDialogFilter>(); switch (settings) { case ApiPackOpenFileDialogSettings f: filters = ApiPackDialogFilterCreator.Create(f.Filter); break; case ApiPackSaveFileDialogSettings s: filters = ApiPackDialogFilterCreator.Create(s.Filter); break; default: return dialog; } filters.ForEach(f => dialog.Filters.Add(f)); return dialog; } /// <summary>戻り値を設定します。</summary> /// <param name="dialog">表示したダイアログを表すFileDialog。</param> /// <param name="settings">設定情報を表すIDialogSettings。</param> private void setReturnValues(CommonFileDialog dialog, ICommonDialogSettings settings) { switch (settings) { case ApiPackOpenFileDialogSettings o: o.FileName = dialog.FileName; o.FileNames = (dialog as CommonOpenFileDialog)?.FileNames.ToList(); break; case ApiPackSaveFileDialogSettings s: s.FileName = dialog.FileName; break; case ApiPackFolderBrowsDialogSettings f: f.SelectedFolderPath = dialog.FileName; break; default: break; } } } } |
episode: 15 では vsvyatski/Ookii.Dialogs GitHub 版 を使用しました(2022/8/23 現在、リポジトリは削除されているようです)が、ここでは Windows-API-Code-Pack-1.1 に含まれる CommonFileDialog を表示しています。
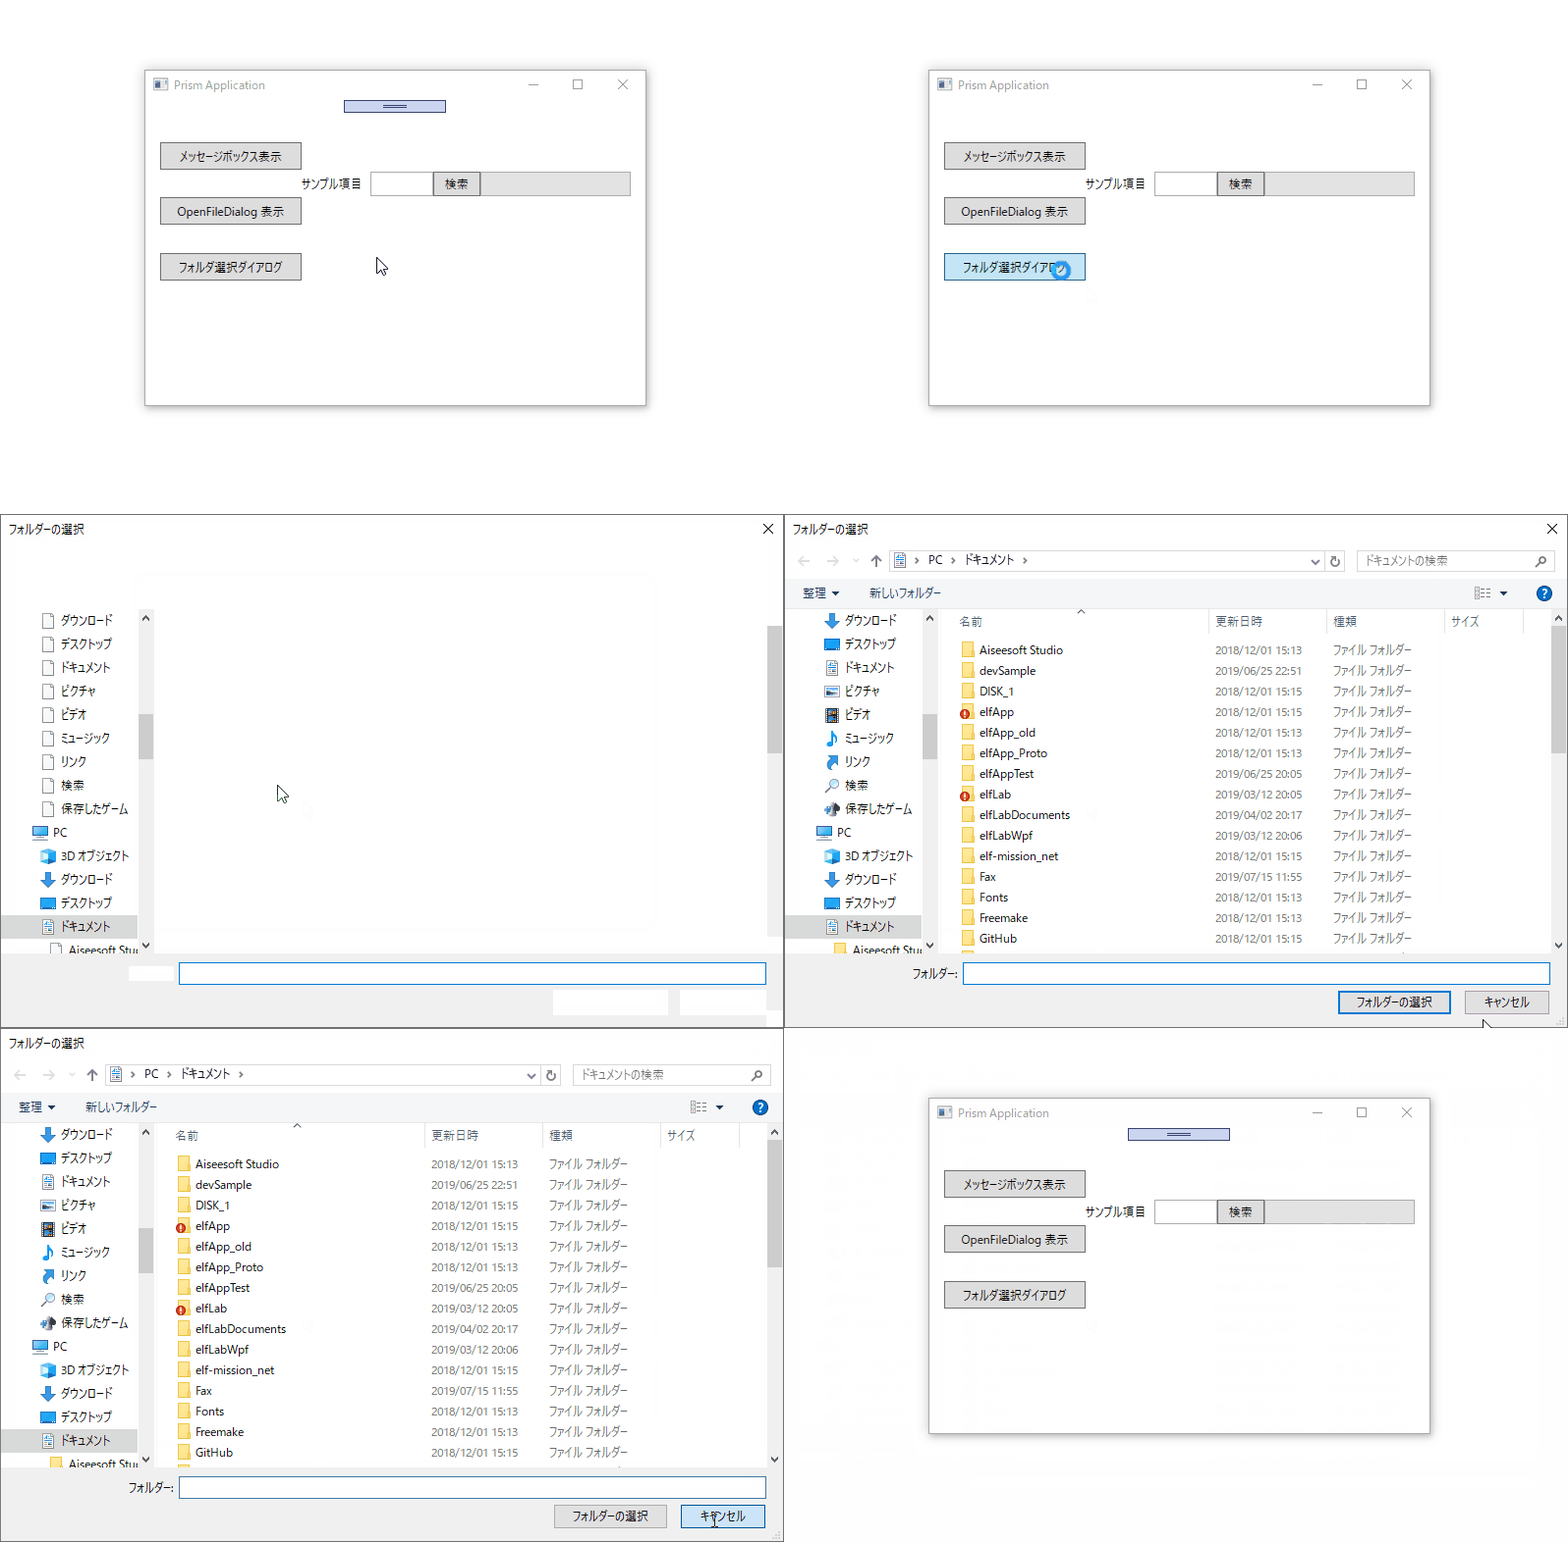
実行すると fig. 5 のように Windows API Code Pack 版のフォルダ選択ダイアログが表示できます。

fig.5 フォルダ選択ダイアログを表示
ここで紹介した方法は Prism 7.2 以降限定と言う訳ではなく、Prism 7.1 以前のプロジェクトにも適用できます。
episode: 15 で紹介した方法は煩雑なので、ここで紹介した方法を選択する方が良いと思います。
いつもの通り、ここで紹介したサンプルコードは GitHub リポジトリ に上げておきます。
ここ 1 か月半くらい残業・休出続きでなかなか新規エントリを公開できませんでしたが、やっと落ち着いたので又ちょっとづつ公開していきたいと思っています。
一応、次回は extra シリーズとして ReactvieProperty の変更通知を Subscribe する方法を予定しています。
次回記事「Livet が Prism に「IDisposable 呼び出し用」としてゲッツされた件【episode: 18 WPF Prism】」


