Model のインタフェースの上に ReactiveCommand は立っている【step: 8 .NET Core WPF MVVM ReactiveCommand 入門 2020】

新作アニメの一覧作成に手を出してしまったので思っていた以上に間が空きましたが、前回は ReactiveProperty と ReactivePropertySlim の基本的な使い方と、Model ⇔ VM 間を双方向でバインドする方法を紹介しました。
今回は ReactiveProperty に含まれる ICommand を実装した ReactiveCommand と AsyncReactiveCommand の基本的な使用方法と Command から呼び出す Model のインタフェースを紹介します。
尚、ReactiveProperty については step: 7【ReactiveProperty を編む】で詳しく紹介しています。
ReactiveCollection については step: 9【ReactiveCollection 世代の ListBox 達】で詳しく紹介しています。
尚、この記事は Visual Studio 2019 Community Edition で .NET Core 3.1 以上 と C# + Prism + ReactiveProperty + MahApps.Metro + Material Design In XAML Toolkit + AutoMapper を使用して、WPF アプリケーションを MVVM パターンで作成するのが目的なので、C# の文法や基本的なコーディング知識を持っている人が対象です。
目次
ReactiveCommand
step: 6 では Prism の DelegateCommand を利用してボタンの Command とバインドする例を紹介しましたが、ReactiveProperty にも同じように ICommand を実装した ReactiveCommand と AsyncReactiveCommand が含まれています。
サンプルに使用する画面は前回も使用した fig. 1 の画面を流用します。
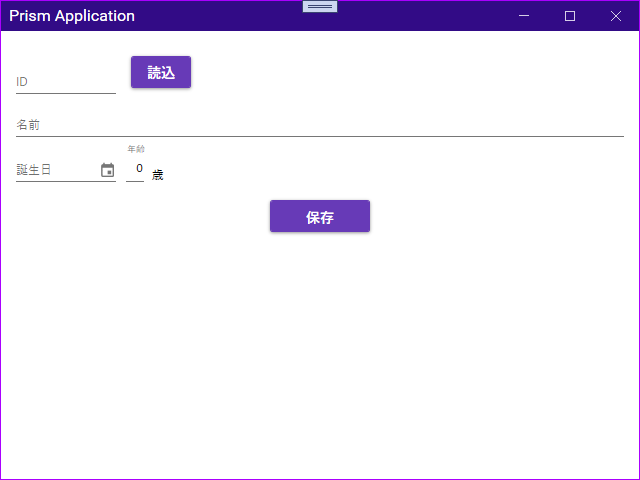
fig.1 サンプル画面
src. 1 は fig. 1 の『読込ボタン』とバインドする LoadClick コマンドを追加した VM です。
1 2 3 4 5 6 7 8 9 10 11 12 13 14 15 16 17 18 19 20 21 22 23 24 25 26 27 28 29 30 31 32 | using System; using System.Reactive.Disposables; using Prism.Mvvm; using Prism.Navigation; using Reactive.Bindings; using Reactive.Bindings.Extensions; namespace PrismSample.ReactiveMvvm { /// <summary>ReactivePropertyのデータバインディングサンプル用ViewModelを表します。</summary> public class ReactiveSamplePanelViewModel : BindableBase, IDestructible { ~ 略 ~ /// <summary>読込ボタンClickコマンド</summary> public ReactiveCommand LoadClick { get; } /// <summary>読込処理</summary> private void onLoadClick() { } private CompositeDisposable disposables = new CompositeDisposable(); ~ 略 ~ /// <summary>コンストラクタ。</summary> public ReactiveSamplePanelViewModel(IDataAgent dataAgent, PersonSlim initPerson) { ~ 略 ~ this.LoadClick = new ReactiveCommand(); this.LoadClick.Subscribe(() => this.onLoadClick()) .AddTo(this.disposables); } ~ 略 ~ } } |
Command で実行する処理は前回紹介した ReactiveProperty の場合と同じく Subscribe メソッドを使用してラムダ式を指定するか別メソッドに delegate します。
src. 1 で delegate している onLoadClick は未実装なので『読込ボタン』を Click しても何も起こりませんが、コントロールからの Command は受け取れています。src. 1 のように ReactiveCommand の初期化と Subscribe を別々に記述することもできますが、src. 2 のように WithSubscribe を使用すると初期化と同時に処理を指定することもできます。
1 2 3 4 5 6 7 8 9 10 11 12 13 14 15 16 17 | namespace PrismSample.ReactiveMvvm { /// <summary>ReactivePropertyのデータバインディングサンプル用ViewModelを表します。</summary> public class ReactiveSamplePanelViewModel : BindableBase, IDestructible { ~ 略 ~ /// <summary>コンストラクタ。</summary> public ReactiveSamplePanelViewModel(IDataAgent dataAgent, PersonSlim initPerson) { ~ 略 ~ this.LoadClick = new ReactiveCommand() .WithSubscribe(() => this.onLoadClick()) .AddTo(this.disposables); } ~ 略 ~ } } |
src. 1 のように別々に記述しても特にメリットがある訳ではないので src. 2 のように WithSubscribe を使用すれば良いと思います。
ReactiveCommand のコードスニペット
前回紹介した通りに ReactiveProperty のコードスニペットをインストールしていれば ReactiveCommand もコードスニペットで入力できます。
fig. 2 は ReactiveCommand を入力するための『rcomm コードスニペット』と AsyncReactiveCommand を入力するための『arcomm コードスニペット』です。

fig.2 ReactiveCommand のコードスニペット
又、fig. 2 では確認できませんが、パラメータを受け取る『rcommg と arcommg コードスニペット』も含まれています。但し、ReactiveCommand のコードスニペットは定義部分しか入力されないので、そこまで便利だと感じないかもしれません。
ReactiveCommand の CanExecute
ReactiveCommand は ICommand を継承しているので CanExecute を設定すると CommandSource の IsEnabled に反映されますが、常に実行可能な Command は上の src. 1、2 のように new ReactiveCommand() で作成できます。step: 6 で紹介した Prism の DelegateCommand に設定する CanExecute は bool でしたが、ReactiveCommand の場合は IObservable<bool> を指定する必要があります。
ReactiveProperty(Slim)<T> は IObservable<T> も継承しているので、ReactiveProperty(Slim)<bool> 型の変数(private プロパティ or フィールド)を用意すれば CanExecute のソースに指定できます。
例えば、fig. 1 の『ID TextBox』に何か入力されている場合のみ『読込ボタン』を有効にするには src. 3 のように ReactivePropertySlim<bool> 型の hasId フィールドを追加して CanExecute に設定します。
1 2 3 4 5 6 7 8 9 10 11 12 13 14 15 16 17 18 19 20 21 22 23 24 25 26 27 28 29 30 31 32 33 34 35 36 37 38 39 40 41 42 43 44 45 46 47 | using System; using System.Reactive.Disposables; using System.Reactive.Linq; using Prism.Mvvm; using Prism.Navigation; using Reactive.Bindings; using Reactive.Bindings.Extensions; namespace PrismSample.ReactiveMvvm { /// <summary>ReactivePropertyのデータバインディングサンプル用ViewModelを表します。</summary> public class ReactiveSamplePanelViewModel : BindableBase, IDestructible { /// <summary>IDを取得・設定します。</summary> public ReactivePropertySlim<int?> Id { get; } ~ 略 ~ /// <summary>読込ボタンClickコマンド</summary> public ReactiveCommand LoadClick { get; } /// <summary>読込処理</summary> private void onLoadClick() { } private CompositeDisposable disposables = new CompositeDisposable(); ~ 略 ~ private ReactivePropertySlim<bool> hasId; /// <summary>コンストラクタ。</summary> public ReactiveSamplePanelViewModel(IDataAgent dataAgent, PersonSlim initPerson) { this.hasId = new ReactivePropertySlim<bool>(false) .AddTo(this.disposables); ~ 略 ~ this.Id = this.personSlim.Id .ToReactivePropertySlimAsSynchronized(x => x.Value) .AddTo(this.disposables); ~ 略 ~ this.Id.Subscribe(v => this.hasId.Value = v.HasValue); ~ 略 ~ this.LoadClick = this.hasId .ToReactiveCommand() .WithSubscribe(() => this.onLoadClick()) .AddTo(this.disposables); } ~ 略 ~ } } |
前回紹介した通り ReactiveProperty(Slim)で定義したプロパティを Subscribe すると値変更時に処理が追加できるので『ID TextBox』とバインドしている『Id プロパティを』Subscribe して hasId フィールドを更新しています。
そして hasId(IObservable<bool>)から ToReactiveCommand すると hasId フィールドの値が CanExecute に渡されるようになり、実行すると fig. 3 のようになります。
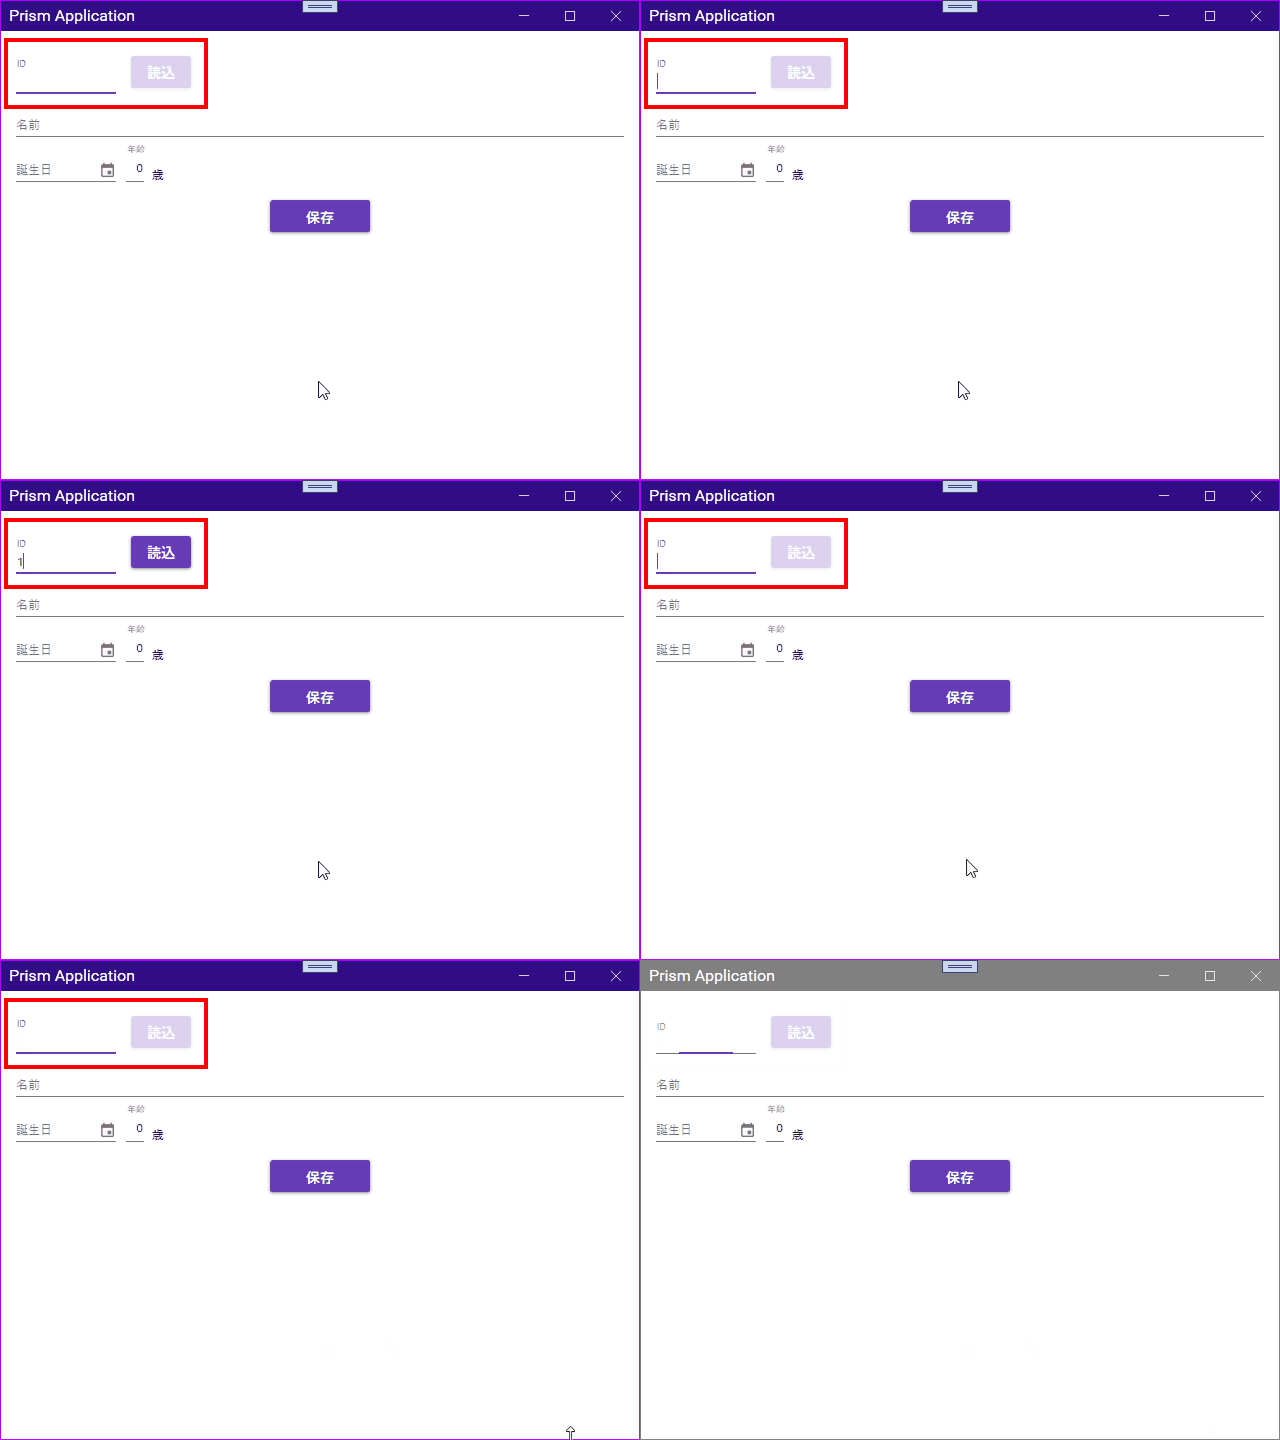
fig.3 CanExecute のサンプル
『ID TextBox』への入力有無で『読込ボタン』の IsEnabled が変わるのが確認できます。CanExecute は src. 3 のように ToReactiveCommand で指定する事もできますが、new ReactiveCommand(hasId) のようにコンストラクタの第 1 パラメータに指定する事もできます。
IObservable<bool> を継承する ReactiveCommand
かずきさんが書かれた『MVVM をリアクティブプログラミングで快適に ReactiveProperty オーバービュー 2020 年版 中編 – Qiita』からのパクリですが ReactiveCommand は IObservable<bool> も継承しています。
そのため src. 4 のように Select(Where や Concat 等も利用可能)で処理した結果を ReactiveProperty(Slim)等に変換できます。
1 2 3 4 5 6 7 8 9 10 11 12 13 14 15 16 17 18 19 20 21 22 23 24 25 26 27 28 29 30 31 32 33 34 | using System; using System.Reactive.Disposables; using System.Reactive.Linq; using Prism.Mvvm; using Prism.Navigation; using Reactive.Bindings; using Reactive.Bindings.Extensions; namespace PrismSample.ReactiveMvvm { /// <summary>ReactivePropertyのデータバインディングサンプル用ViewModelを表します。</summary> public class ReactiveSamplePanelViewModel : BindableBase, IDestructible { ~ 略 ~ /// <summary>現在日時を取得します。</summary> public ReadOnlyReactivePropertySlim<string> NowDateTime { get; } ~ 略 ~ /// <summary>現在日時取得ボタンのCommandを表します。</summary> public ReactiveCommand NowDateTimeClick { get; } ~ 略 ~ /// <summary>コンストラクタ。</summary> public ReactiveSamplePanelViewModel(IDataAgent dataAgent, PersonSlim initPerson) { ~ 略 ~ this.NowDateTimeClick = new ReactiveCommand() .AddTo(this.disposables); this.NowDateTime = this.NowDateTimeClick .Select(_ => DateTime.Now.ToString("yyyy/MM/dd HH:mm:ss")) .ToReadOnlyReactivePropertySlim() .AddTo(this.disposables); } ~ 略 ~ } } |
Select 拡張メソッドを呼び出すと Command 呼び出しの(ボタンを Click する)度、指定したラムダ式や delegate 先の処理が呼び出されるので、実行すると fig. 4 のようになります。
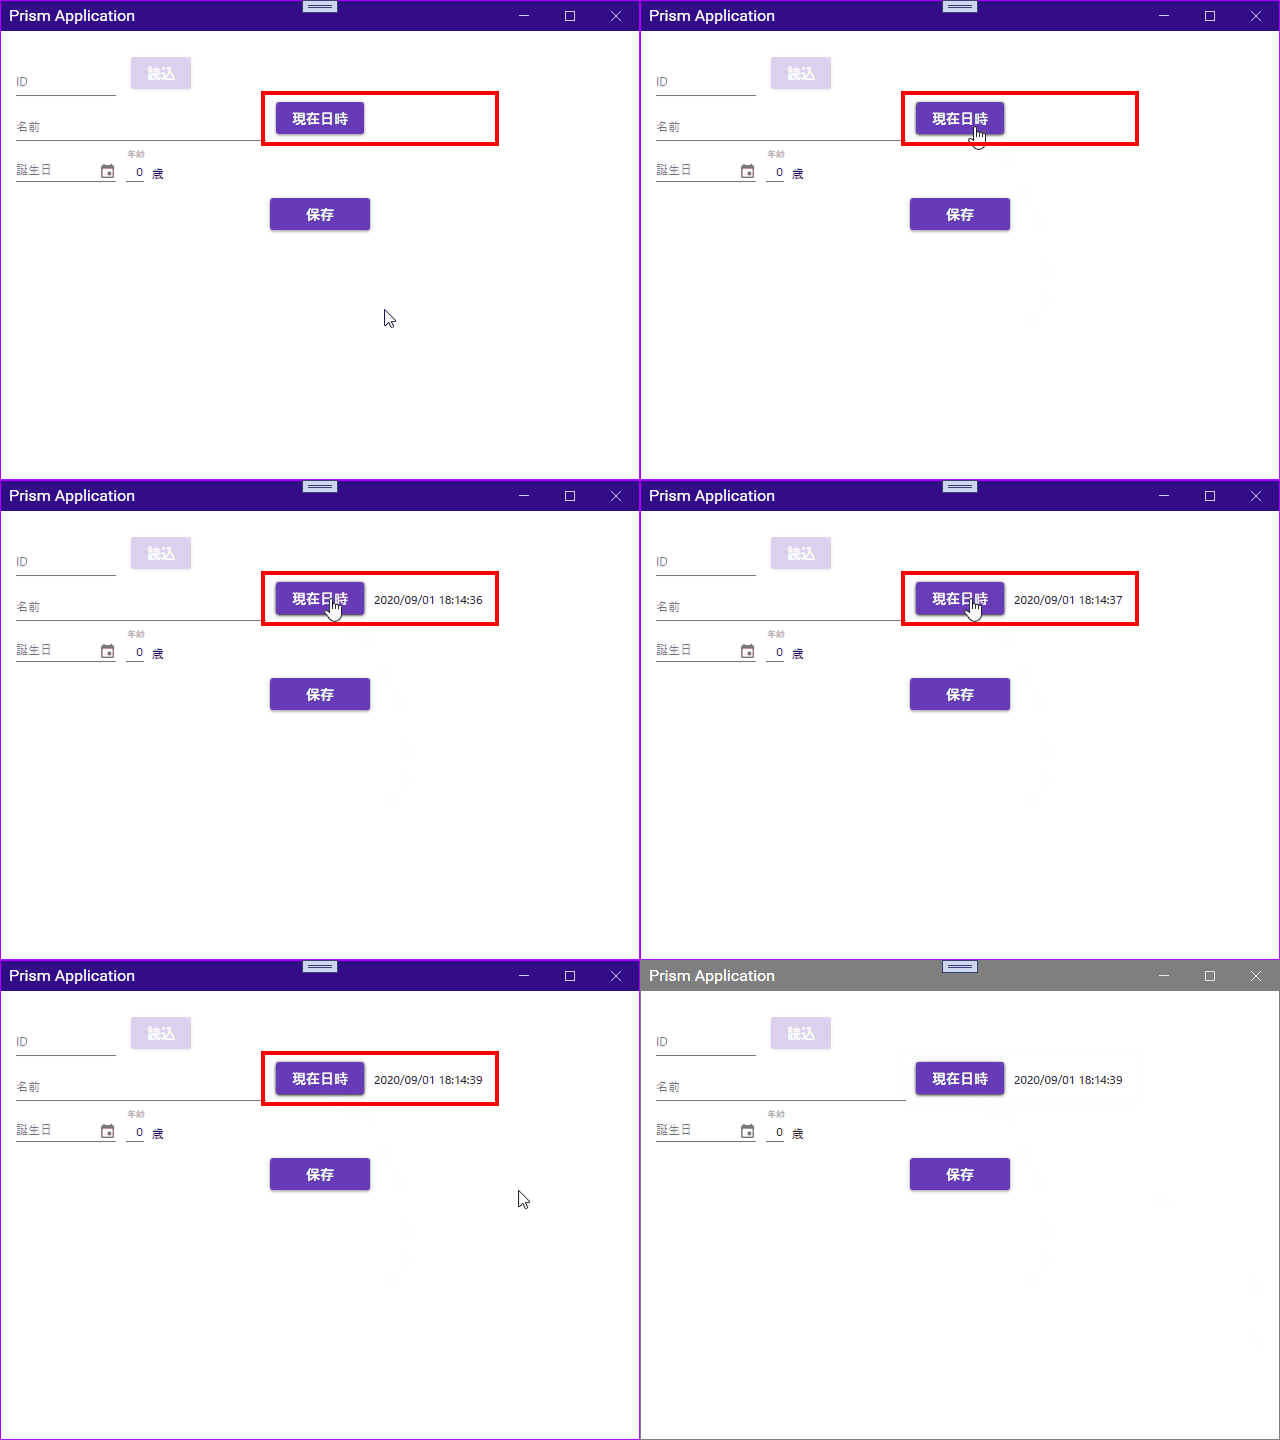
fig.4 ReactiveCommand を ReactiveProperty に変換
確かに src. 4 のように書くとスマートだとは思いますが、管理人的には無理に Reactive Extensions が提供する拡張メソッドを使用しなくても、今まで紹介した WithSubscribe 等で別途用意したプロパティへ値を設定するような方法でも構わないと思っています。どちらの方法を採用しても見た目の動作は同じなので、使い始めの時はあまり Reactive Extensions に拘らず徐々に覚えていけば良いと思います。
AsyncReactiveCommand
WPF のボタンで 2 度押しを防止したい場合、Windows Form のように Click イベントの先頭でボタンの IsEnabled を false に設定するような処理を追加しても WPF では最初の Click 処理完了後に 2 度目の Click 処理が開始されてしまうので同じ方法では防止できません。
そのため以前は『ReactivePropertyで2度押し防止 – かずきのBlog@hatena』で紹介されているような方法で防いでいたようですが、ReactiveProperty Ver. 3.0.0 で追加された AsyncReactiveCommand を使用すると非同期処理が終了するまで押せないボタンになるので、結果的に 2 度押し防止が実現できます。
今は async/await のおかげで非同期処理も書き易くなったと思うので、この連載で使用する Command は基本的に AsyncReactiveCommand を使用します。(管理人が非同期処理の書き方を試したいだけとも言います)
但し、AsyncReactiveCommand は IObservable<T> を継承していないので前章の最後で紹介した Select 等の Reactive Extensions が提供する拡張メソッド類は使用できず WithSubscribe か Subscribe するしかないと言う違いはあります。ですが、基本的な使い方は ReactiveCommand と同じなので、AsyncReactiveCommand で書いたサンプルも ReactiveCommand で読み替える事ができます。
Command のパラメータ
Command をバインドする時、src. 5 のようにパラメータを指定する事もできます。
1 2 3 4 5 6 7 8 9 10 11 12 13 14 15 16 17 18 19 20 21 22 | <UserControl x:Class="PrismSample.ReactiveMvvm.ReactiveSamplePanel" ~ 略 ~ prism:ViewModelLocator.AutoWireViewModel="True"> ~ 略 ~ <Grid Margin="15, 20, 15, 0"> ~ 略 ~ <StackPanel Grid.Row="4" Orientation="Horizontal"> <Button Content="10分前" Command="{Binding PastTimeClick}" CommandParameter="10"/> <Button Content="20分前" Margin="10 0 0 0" Command="{Binding PastTimeClick}" CommandParameter="20"/> <TextBlock VerticalAlignment="Center" Margin="10 0 0 0" Text="{Binding PastTime.Value}"/> </StackPanel> </Grid> </Grid> </UserControl> |
XAML に設定したパラメータの受け取りには src. 6 のように型パラメータ付きの(Async)ReactiveCommand で受け取る事ができます。
1 2 3 4 5 6 7 8 9 10 11 12 13 14 15 16 17 18 19 20 21 22 23 24 25 26 27 28 29 30 31 32 33 34 35 36 37 38 39 40 41 42 43 44 45 46 47 48 49 50 51 52 53 54 55 | using System; using System.Diagnostics; using System.Reactive.Disposables; using System.Reactive.Linq; using System.Threading.Tasks; using Prism.Mvvm; using Prism.Navigation; using Reactive.Bindings; using Reactive.Bindings.Extensions; namespace PrismSample.ReactiveMvvm { /// <summary>ReactivePropertyのデータバインディングサンプル用ViewModelを表します。</summary> public class ReactiveSamplePanelViewModel : BindableBase, IDestructible { ~ 略 ~ /// <summary>パラメータで指定した分数を減算した時刻を取得します。</summary> public ReadOnlyReactivePropertySlim<string> PastTime { get; } ~ 略 ~ /// <summary>パラメータを受け取るCommand。</summary> public AsyncReactiveCommand<string> PastTimeClick { get; } /// <summary>10分前、20分前ボタンで過去時刻を表示します。</summary> /// <param name="interval">Commandに設定したパラメータを表す文字列。</param> /// <returns>非同期処理のTask。</returns> private Task onPastTimeClickAsync(string interval) { return Task.Run(() => { this.pastText.Value = DateTime.Now.AddMinutes(-1 * Convert.ToInt32(interval)).ToString("yyyy/MM/dd HH:mm:ss"); }); } ~ 略 ~ /// <summary>コンストラクタ。</summary> public ReactiveSamplePanelViewModel(IDataAgent dataAgent, PersonSlim initPerson) { ~ 略 ~ this.pastText = new ReactivePropertySlim<string>(string.Empty) .AddTo(this.disposables); ~ 略 ~ this.PastTime = this.pastText .ToReadOnlyReactivePropertySlim() .AddTo(this.disposables); ~ 略 ~ //this.PastTimeClick = new AsyncReactiveCommand<string>() // .WithSubscribe(i => Task.Run(() => this.pastText.Value = DateTime.Now.AddMinutes(-1 * Convert.ToInt32(i)).ToString("yyyy/MM/dd HH:mm:ss"))) // .AddTo(this.disposables); this.PastTimeClick = new AsyncReactiveCommand<string>() .WithSubscribe(i => this.onPastTimeClickAsync(i)) .AddTo(this.disposables); } ~ 略 ~ } } |
AsyncReactiveCommand で宣言しているので意味の無いスレッドを起こしていますが、XAML に設定した CommandParameter は 56 ~ 58 行目のように WithSubscribe の第 1 パラメータへセットされます。一応、AsyncReactiveCommand をラムダ式で実行する例もコメントアウトして残しています。
src. 5 のように XAML へ CommandParameter を直接書いた場合(Async)ReactiveCommand の型パラメータには string しか指定できませんが、CommandParameter はバインドを設定することもできます。ですが、CommandParameter をバインドすると言う事は VM 側でもその時設定する値は分かっているので意味がありません。そのため、CommandParameter をバインドする必要は無さそうです。
つまり、CommandParameter はバインドするのではなく XAML に直接値を記述するための項目だと言えるので、主な用途は複数コントロールの CommandSource を 1 つの(Async)ReactiveCommand にバインドするような場合に、どのコントロールからの Command なのかを判別するような場合に限られると思います。
ちなみに、複数コントロールの CommandSource を 1 つの(Async)ReactiveCommand にバインドする場合でも特別な設定は不要で、今までのサンプルと同じくバインド先を指定するだけです。
(VM から通知する CanExecute は 1 つなので片方は true、もう一方は false 等と言う事はできません)
コントロールのイベントを VM で受け取る
これまでは Button.Command のようなコントロール側に用意されている Command にバインドする例を紹介してきました。Windows Form ではコードビハインドのイベントハンドラに処理を書く手法が当たり前だったので WPF でもイベントを VM で処理したい場合もあると思います。
WPF でもコードビハインドにイベントハンドラを作成する事はできますが、MVVM パターンで作成する場合はコードビハインドに処理を書くことは躊躇うでしょうし、イベントも VM で処理したいと考えると思いますが、Windows Form で使用していたイベントが全て Command として定義されている訳ではありません。
イベントは Command に変換すれば VM で受け取れるようになるので、ReactiveProperty ではイベントを ReactiveCommand や ReactiveProperty に変換するための EventToReactiveCommand や EventToReactiveProperty が用意されていますが、最初にインストールした ReactiveProperty のパッケージには含まれていないので、WPF 用の別パッケージを追加インストールする必要があります。
EventToReactiveCommand や EventToReactiveProperty を使用するための【ReactiveProperty.WPF パッケージ】も、fig. 5 の『ソリューションの Nuget パッケージの管理画面』で『reactiveproperty』又は『reactive』を検索してインストールします。
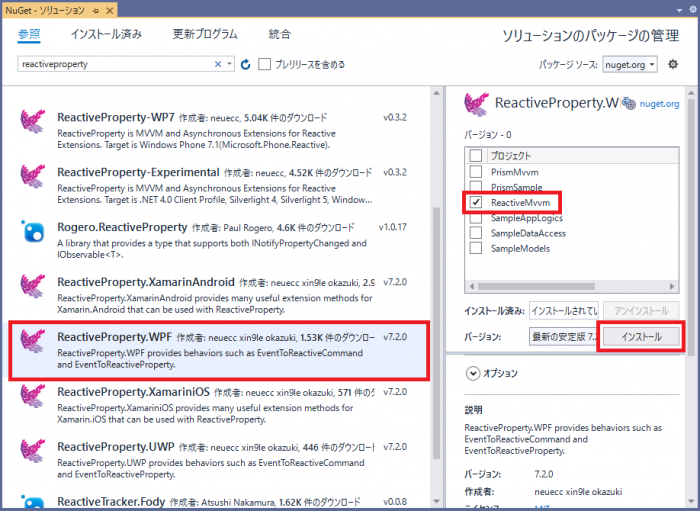
fig.5 ReactiveProperty.WPF パッケージのインストール
【ReactiveProperty.WPF パッケージ】をインストールするとイベントを ReactiveProperty や ReactiveCommand に変換する事はできますが、XAML では EventToReactiveCommand や EventToReactiveProperty を呼び出すためのトリガーを指定する必要があるため『System.Windows.Interactivity.dll から Xaml.Behaviors.Wpf へ』で紹介した Xaml.Behaviors.Wpf も必要になります。
但し、Xaml.Behaviors.Wpf は上でインストールした ReactiveProperty.WPF パッケージにも含まれているので、別途インストールする必要はありません。
イベントを Command に変換する
例として部分 View(UserControl)の Loaded イベントを Command で受け取る方法を紹介します。src. 7 のように XAML へハイライト部分を追加します。
1 2 3 4 5 6 7 8 9 10 11 12 13 14 15 16 17 18 19 20 21 | <UserControl x:Class="PrismSample.ReactiveMvvm.ReactiveSamplePanel" xmlns="http://schemas.microsoft.com/winfx/2006/xaml/presentation" xmlns:x="http://schemas.microsoft.com/winfx/2006/xaml" xmlns:mc="http://schemas.openxmlformats.org/markup-compatibility/2006" xmlns:d="http://schemas.microsoft.com/expression/blend/2008" xmlns:bh="http://schemas.microsoft.com/xaml/behaviors" xmlns:prism="http://prismlibrary.com/" xmlns:md="http://materialdesigninxaml.net/winfx/xaml/themes" xmlns:rp="clr-namespace:Reactive.Bindings.Interactivity;assembly=ReactiveProperty.WPF" xmlns:local="clr-namespace:PrismSample.ReactiveMvvm" mc:Ignorable="d" d:DesignHeight="480" d:DesignWidth="640" prism:ViewModelLocator.AutoWireViewModel="True"> ~ 略 ~ <bh:Interaction.Triggers> <bh:EventTrigger EventName="Loaded"> <rp:EventToReactiveCommand Command="{Binding ViewLoaded}" /> </bh:EventTrigger> </bh:Interaction.Triggers> ~ 略 ~ </UserControl> |
『System.Windows.Interactivity.dll から Xaml.Behaviors.Wpf へ』で紹介した通り XAML でイベントをハンドルするには Interaction.Triggers の EventTrigger を使用します。
EventTrigger.EventName は正式なイベント名を Microsoft Docs 等で調べて指定します。
後は Command に VM へ定義した(Async)ReactiveCommand を指定すると VM でイベントを受け取れるようになります。
Prism にも EventToReactiveCommand と同じくイベントを Command に変換するための InvokeCommandAction が含まれていますが、System.Windows.Interactivity.dll に依存しているため、現時点では .NET Core、Framework のどちらを選択した場合でも Prism の InvokeCommandAction は使用できないと考えた方が良いと思います。
ReactiveProperty を使用しない場合、Xaml.Behaviors.Wpf に含まれる Prism に含まれる同名の InvokeCommandAction クラスを使用すれば EventToReactiveCommand と同じようにイベントを Command に変換できます。この Xaml.Behaviors.Wpf に含まれる InvokeCommandAction をサラっと見た所 Prism の InvokeCommandAction より高機能っぽいのでReactiveProperty を使用しない場合は Xaml.Behaviors.Wpf に含まれる InvokeCommandAction を使用した方が良いかもしれません。
src. 8 のように Command に変換したイベントを受け取ることができますが、通常の Command の場合と変わりません。
1 2 3 4 5 6 7 8 9 10 11 12 13 14 15 16 17 18 19 20 21 22 23 24 25 26 27 28 29 30 | using System; using System.Diagnostics; using System.Reactive.Disposables; using System.Reactive.Linq; using System.Threading.Tasks; using Prism.Mvvm; using Prism.Navigation; using Reactive.Bindings; using Reactive.Bindings.Extensions; namespace PrismSample.ReactiveMvvm { /// <summary>ReactivePropertyのデータバインディングサンプル用ViewModelを表します。</summary> public class ReactiveSamplePanelViewModel : BindableBase, IDestructible { ~ 略 ~ /// <summary>部分ViewのLoadedイベントハンドラ。</summary> public AsyncReactiveCommand ViewLoaded { get; } ~ 略 ~ /// <summary>コンストラクタ。</summary> public ReactiveSamplePanelViewModel(IDataAgent dataAgent, PersonSlim initPerson) { ~ 略 ~ this.ViewLoaded = new AsyncReactiveCommand() .WithSubscribe(() => Task.Run(() => Debug.WriteLine("Loaded!"))) .AddTo(this.disposables); } ~ 略 ~ } } |
実行するとイミディエイトウィンドウに『Loaded!』が出力されるので Loaded イベントが受け取れている事が確認できます。
本章ではイベントを Command に変換してバインドする方法を紹介しましたが、基本的に EventToReactiveCommand や EventToReactiveProperty の使用は極力避けるべきだと管理人は考えています。イベント以外に選択肢が無い場面が存在するのも確かですが、本来上のような Loaded イベントは VM のコンストラクタに書けば済みます(書くべきです)。
Prism 等のフレームワークが持つ機能を把握しきれなくて代わりにイベントを使ってしまう等、多少しょうがない場合がある(管理人にもありました)事も理解していますが、WPF アプリを MVVM パターンで作成するならまず、プロパティの変更通知で処理できないかを探す方が重要だと思います。
Xaml.Behaviors.Wpf + EventToReactiveCommand でイベントを処理するのは確かにお手軽かもしれませんが、プロパティの変更をトリガーに処理を書くのが MVVM パターンの基本だと思うので、イベントに処理を書こうと考えた時には、その前に ReactiveProperty の Subscribe 等で対応できないかを考える事は重要です。
EventArgs を取得する
イベントが受け取れると EventArgs も取得したくなる場合もあると思いますが、EventToReactiveCommand、EventToReactiveProperty のどちらを使った場合でも取得できます。かずきさんが書かれた『MVVM をリアクティブプログラミングで快適に ReactiveProperty オーバービュー 2020 年版 後編』では EventArgs を Converter で変換する例を紹介されていますが、Converter を通さず EventArgs 自体を受け取る事もできます。
src. 9 は上のかずきさんの記事を真似て MouseMove をハンドルした XAML です。
1 2 3 4 5 6 7 8 9 10 11 12 13 14 15 16 17 18 19 20 21 22 23 24 25 | <UserControl x:Class="PrismSample.ReactiveMvvm.ReactiveSamplePanel" xmlns="http://schemas.microsoft.com/winfx/2006/xaml/presentation" xmlns:x="http://schemas.microsoft.com/winfx/2006/xaml" xmlns:mc="http://schemas.openxmlformats.org/markup-compatibility/2006" xmlns:d="http://schemas.microsoft.com/expression/blend/2008" xmlns:bh="http://schemas.microsoft.com/xaml/behaviors" xmlns:prism="http://prismlibrary.com/" xmlns:md="http://materialdesigninxaml.net/winfx/xaml/themes" xmlns:rp="clr-namespace:Reactive.Bindings.Interactivity;assembly=ReactiveProperty.WPF" xmlns:local="clr-namespace:PrismSample.ReactiveMvvm" mc:Ignorable="d" d:DesignHeight="480" d:DesignWidth="640" prism:ViewModelLocator.AutoWireViewModel="True"> ~ 略 ~ <bh:Interaction.Triggers> <bh:EventTrigger EventName="Loaded"> <rp:EventToReactiveCommand Command="{Binding ViewLoaded}" /> </bh:EventTrigger> <bh:EventTrigger EventName="MouseMove"> <!--<rp:EventToReactiveProperty ReactiveProperty="{Binding MousePoint}" />--> <rp:EventToReactiveCommand Command="{Binding MouseMove}" /> </bh:EventTrigger> </bh:Interaction.Triggers> ~ 略 ~ </UserControl> |
XAML 側は Loaded イベントをハンドルした場合と変わりません。以降は EventToReactiveCommand の例を紹介しますが、一応 EventToReactiveProperty のバインド例もコメントアウトして残しています。
コメントアウトしている EventToReactiveProperty.ReactiveProperty は今までと同じくバインディング先のプロパティ名を指定しますが【.Value】を付けるとバインドされないので気を付けてください。
src. 9 とバインドする VM が src. 10 です。
1 2 3 4 5 6 7 8 9 10 11 12 13 14 15 16 17 18 19 20 21 22 23 24 25 26 27 28 29 30 31 32 33 34 35 36 37 38 39 40 41 42 43 44 45 46 47 48 49 50 51 52 53 54 55 | using System; using System.Diagnostics; using System.Reactive.Disposables; using System.Reactive.Linq; using System.Threading.Tasks; using System.Windows.Input; using Prism.Mvvm; using Prism.Navigation; using Reactive.Bindings; using Reactive.Bindings.Extensions; namespace PrismSample.ReactiveMvvm { /// <summary>ReactivePropertyのデータバインディングサンプル用ViewModelを表します。</summary> public class ReactiveSamplePanelViewModel : BindableBase, IDestructible { ~ 略 ~ /// <summary>MouseMoveイベントを受け取ります。</summary> public ReactivePropertySlim<MouseEventArgs> MousePoint { get; } /// <summary>現在のマウス座標を取得・設定します。</summary> public ReactivePropertySlim<string> CurrentMousePoint { get; } ~ 略 ~ /// <summary>MouseMoveイベントを受け取るCommand。</summary> public ReactiveCommand<MouseEventArgs> MouseMove { get; } ~ 略 ~ /// <summary>マウス座標をCurrentMousePointに表示します。</summary> /// <param name="args">MouseMoveイベントパラメータを表すMouseEventArgs。</param> private void onMousePoint(MouseEventArgs args) { var pos = args.GetPosition(null); this.CurrentMousePoint.Value = $"(X: {pos.X} Y: {pos.Y})"; } private void onMouseMove(MouseEventArgs args) => this.onMousePoint(args); ~ 略 ~ /// <summary>コンストラクタ。</summary> public ReactiveSamplePanelViewModel(IDataAgent dataAgent, PersonSlim initPerson) { ~ 略 ~ this.CurrentMousePoint = new ReactivePropertySlim<string>(string.Empty) .AddTo(this.disposables); this.MousePoint = new ReactivePropertySlim<MouseEventArgs>(mode: ReactivePropertyMode.None) .AddTo(this.disposables); ~ 略 ~ this.MousePoint.Subscribe(a => this.onMousePoint(a)); ~ 略 ~ this.MouseMove = new ReactiveCommand<MouseEventArgs>() .WithSubscribe(a => this.onMouseMove(a)) .AddTo(this.disposables); } ~ 略 ~ } } |
VM で EventArgs を受け取ると Source や OriginalSource プロパティ等から Command 通知元のコントロールや Window まで取得できてしまうので、ガッツリ View に依存した処理を書くこともできてしまいます。そのため本来は、上で紹介した Qiita のかずきさんの記事 のように Converter を通して渡す値を絞るべきだと思うので、このサンプルは EventArgs を手軽に受け取ることができる事を示すためのサンプルと考えてください。
src. 10 の MousePoint コンストラクタに指定した mode パラメータは同一座標でも変更通知を受け取るために none を指定しています。パラメータの受け取りは型パラメータの指定が増えるだけで今までの記述と変わりません。
実行すると fig. 6 のように『読込ボタン』の右に座標が表示されます。
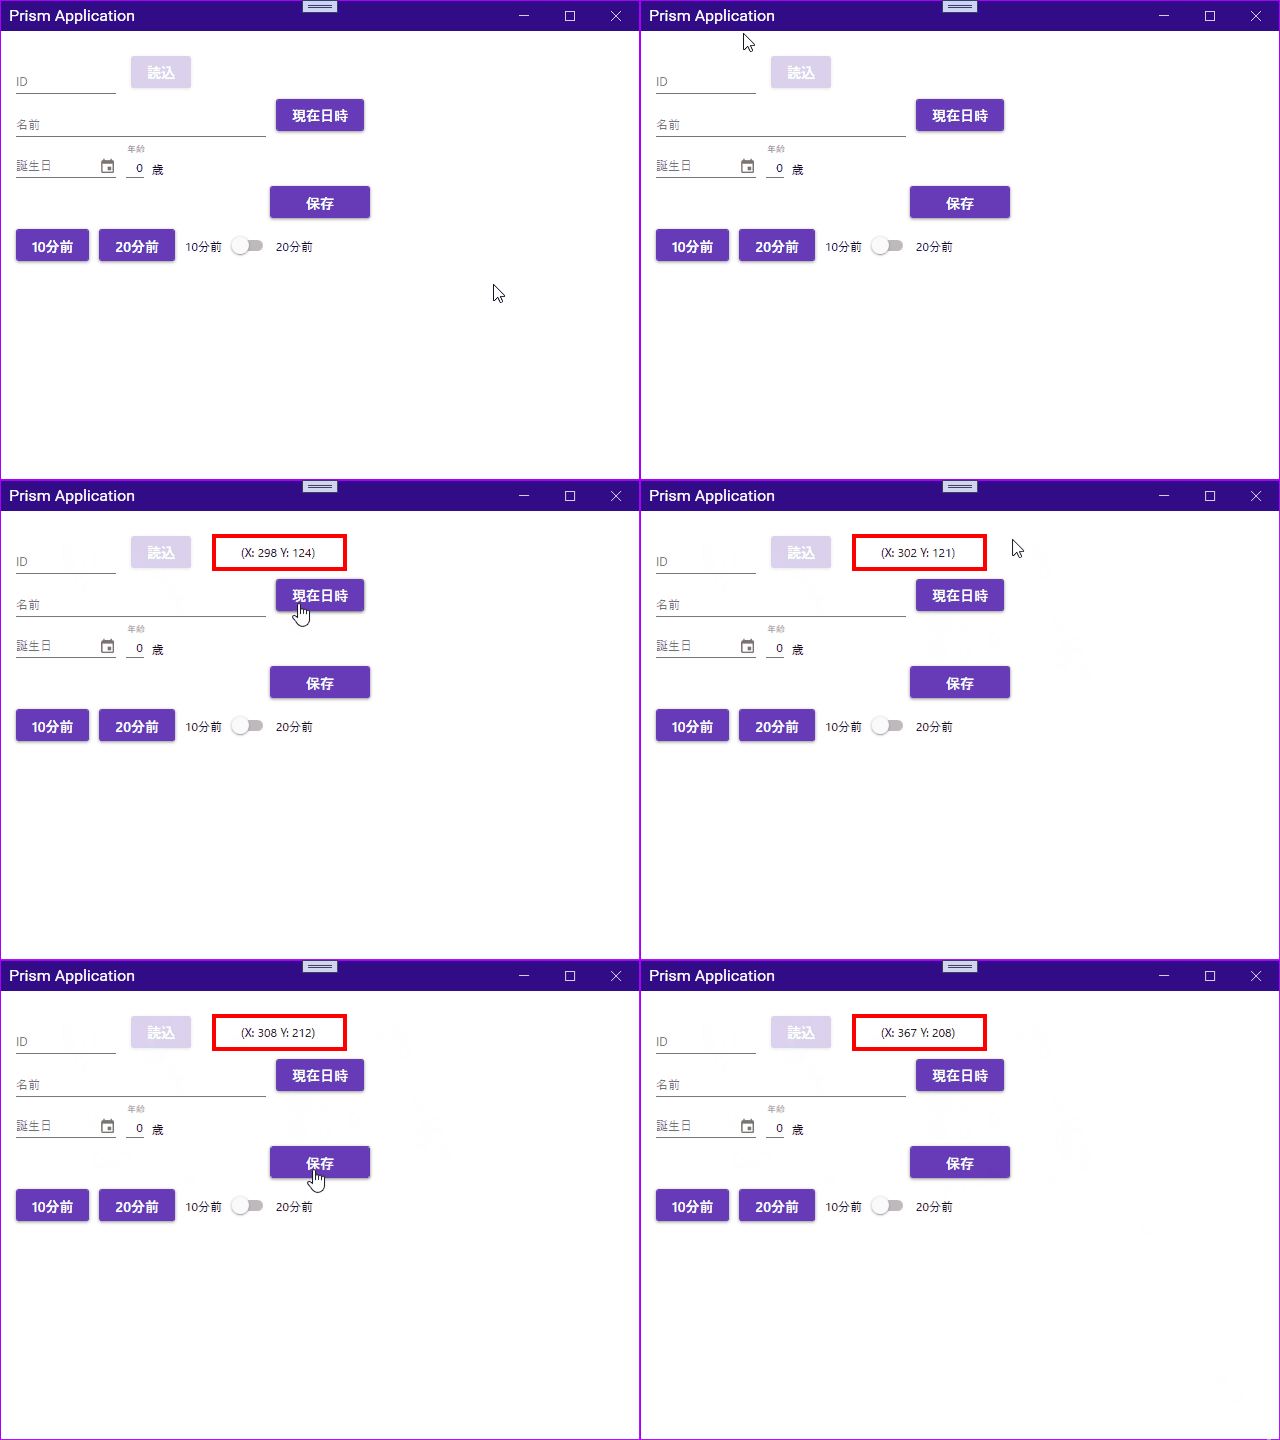
fig.6 MouseMove イベントで座標を表示
新しい画面を用意するのが面倒だったので、src. 9 の通り UserControl の MouseMove を拾っていますが、どうもコントロールを配置した所しかイベントが発生しないようなので、動作を確認するだけのサンプルと考えてください。
Model ⇔ ViewModel ⇔ View をそれぞれ双方向でバインドした場合の Model のインタフェース
ここまでで ReactiveCommand の基本的な使い方は紹介できたと思うので、いよいよ本題の Model ⇔ VM ⇔ View 間をそれぞれ双方向でバインドした場合の Model のインタフェースについて紹介します。
尾上さんが書かれた Model のインタフェースについての記述をここでも再度引用します。
ViewModel に公開する Model のインタフェースは以下の二つしかありません。
- Model のステートの公開とその変更通知
- Model の操作のための戻り値のないメソッド
ステートの公開とその変更通知を行うのは簡単な話でしょう。リッチクライアントの Model はステートフルです。そのステートを公開しないと ViewModel と View は表示すべき情報がありません。そしてその変化を ViewModel と Viewに伝えるために変更通知を行うのも当然の事です。
Model の操作のためのメソッドには戻り値がない・・これにはひっかかる方も多いかもしれません。しかしこれも難しい話ではありません。
Model のメソッド呼び出しは何をもたらすのでしょうか?。それは Model 内状態の変化(あるいは外部サービス呼び出しとそれに伴う Model 内状態の変化)と、なんらかのイベント発生(通信エラー発生とか)しかないのです。ViewModel が Model の影であれば当然それしかないのです。ViewModel が Model を呼び出して Model から戻り値を受け取って何になるんでしょう?それは Model 内のステートの不完全な意味のないコピーでしかありません。
ViewModel に対する Model のインターフェースstep: 6 でも紹介した通り、Model のインタフェースは上の引用を参考に設計します。
まず、本エントリの最初で紹介して未実装のまま放置していた fig. 7 の『読込ボタン』を実装します。
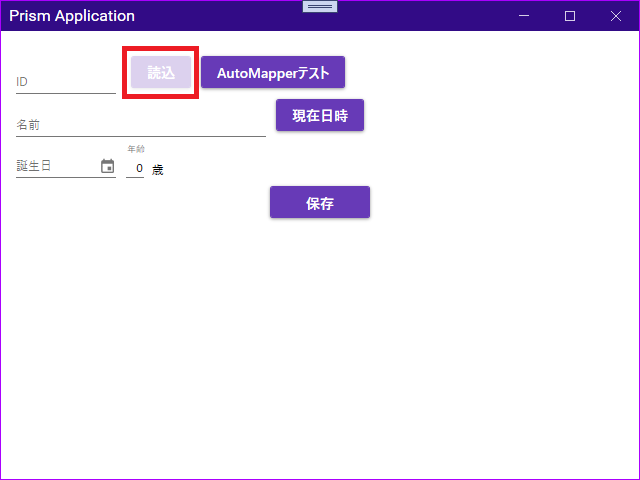
fig.7 サンプル画面
色々な動作紹介のため fig. 1 からコントロール類が増えていますが、赤枠で囲んだ『読込ボタン』の処理は src. 11 のようになります。
1 2 3 4 5 6 7 8 9 10 11 12 13 14 15 16 17 18 19 20 21 22 23 24 25 26 27 28 29 30 31 32 33 34 35 36 37 38 39 40 41 42 43 44 45 46 47 48 49 50 51 52 53 54 55 56 57 58 59 60 61 62 63 64 65 66 67 | using System; using System.Diagnostics; using System.Reactive.Disposables; using System.Reactive.Linq; using System.Threading.Tasks; using System.Windows; using System.Windows.Input; using Prism.Ioc; using Prism.Mvvm; using Prism.Navigation; using Prism.Unity; using Reactive.Bindings; using Reactive.Bindings.Extensions; namespace PrismSample.ReactiveMvvm { /// <summary>ReactivePropertyのデータバインディングサンプル用ViewModelを表します。</summary> public class ReactiveSamplePanelViewModel : BindableBase, IDestructible { /// <summary>IDを取得・設定します。</summary> public ReactivePropertySlim<int?> Id { get; } ~ 略 ~ /// <summary>読込ボタンClickコマンド</summary> public AsyncReactiveCommand LoadClick { get; } ~ 略 ~ /// <summary>読込処理</summary> private async Task onLoadClick() { using (var agent = this.container.Resolve<IDataAgent>()) { await agent.UpdatePersonSlimAsync(this.Id.Value, this.personSlim); } } ~ 略 ~ private CompositeDisposable disposables = new CompositeDisposable(); private PersonSlim personSlim = null; private IContainerProvider container = null; private ReactivePropertySlim<bool> hasId; /// <summary>コンストラクタ。</summary> /// <param name="person">バインドプロパティの初期値に使用するPersonSlim。(DIコンテナからインジェクション)</param> /// <param name="injectionContainer">オブジェクトのインスタンスを取得するIContainerProvider。(DIコンテナからインジェクション)</param> public ReactiveSamplePanelViewModel(PersonSlim person, IContainerProvider injectionContainer) { this.personSlim = person; this.personSlim.AddTo(this.disposables); this.container = injectionContainer; this.hasId = new ReactivePropertySlim<bool>(false) .AddTo(this.disposables); ~ 略 ~ this.Id = this.personSlim.Id .ToReactivePropertySlimAsSynchronized(x => x.Value) .AddTo(this.disposables); ~ 略 ~ this.Id.Subscribe(v => this.hasId.Value = v.HasValue); this.LoadClick = this.hasId .ToAsyncReactiveCommand() .WithSubscribe(() => this.onLoadClick()) .AddTo(this.disposables); ~ 略 ~ } ~ 略 ~ } } |
上の引用の通り Model のインタフェースはデータを取得する場合でも戻り値を返さず、設定対象のエンティティ系モデルをメソッドのパラメータに渡すようにします。Model ⇔ VM 間を双方向でバインドする場合、VM 初期化(コンストラクタ)時にエンティティ系モデル(PersonSlim)のインスタンスが必要なので、Model からの戻り値を受け取らないのは当然と考えられます。
step: 4 でも書きましたが、Model のインタフェースにしている IDataAgent は内部で使用する PersonRepository と生存期間が等しい前提のため止む無く ServiceLocator パターンでインスタンスを取得していますが、推奨される方法ではないので気を付けてください。
大事な事なので何度も書いていますが、本来 IDataAgent はコンストラクタへインジェクションされても問題無い構造で作成すべきです。
Model 側のインタフェース
src. 12 は『読込ボタン』Command から呼び出す IDataAgent.UpdatePersonSlimAsync の中身です。
1 2 3 4 5 6 7 8 9 10 11 12 13 14 15 16 17 18 19 20 21 22 23 24 25 26 27 28 29 30 31 32 33 34 35 36 37 38 39 40 41 42 43 44 45 46 47 48 49 50 51 52 53 54 55 56 57 58 59 60 61 62 63 64 65 66 | using System; using System.Threading.Tasks; namespace PrismSample { /// <summary>データI/O用のAgentを表します。</summary> public class DataAgent : IDataAgent { ~ 略 ~ /// <summary>PersonSlimの内容を更新します。</summary> /// <param name="id">新たに取得するPersonのIDを表すint?。</param> /// <param name="person">更新内容を設定するPersonSlim。</param> /// <returns>非同期処理の実行結果を表すTask。</returns> public async Task UpdatePersonSlimAsync(int? id, PersonSlim person) { if (!id.HasValue) return; var temp = await this.personRepository.GetPersonSlimAsync(); person.Id.Value = temp.Id.Value; person.Name.Value = temp.Name.Value; person.BirthDay.Value = temp.BirthDay.Value; } ~ 略 ~ private IPersonRepository personRepository = null; /// <summary>コンストラクタ。</summary> /// <param name="personRepo">DIコンテナからインジェクションされるIPersonRepository。</param> public DataAgent(IPersonRepository personRepo) { this.personRepository = personRepo; } ~ 略 ~ protected virtual void Dispose(bool disposing) { if (!disposedValue) { if (disposing) // TODO: マネージド状態を破棄します (マネージド オブジェクト) this.personRepository?.Dispose(); ~ 略 ~ // TODO: 大きなフィールドを null に設定します disposedValue = true; } } ~ 略 ~ } /// <summary>Person用のリポジトリを表します。</summary> public class PersonRepository : IPersonRepository { ~ 略 ~ /// <summary>PersonSlimを取得します。</summary> /// <returns>取得したPersonSlim。</returns> public Task<PersonSlim> GetPersonSlimAsync() { return Task.Run(() => { return new PersonSlim(1, "黒崎一護", new DateTime(1998, 7, 15)); }); } ~ 略 ~ } } |
UpdatePersonSlimAsync の第 1 パラメータは『ID項目』の値を渡すためですが、第 2 パラメータの person は View の入力内容がリアルタイムで反映されているため、fig. 7 のように person から ID の値も取得できるので本来は不要です。
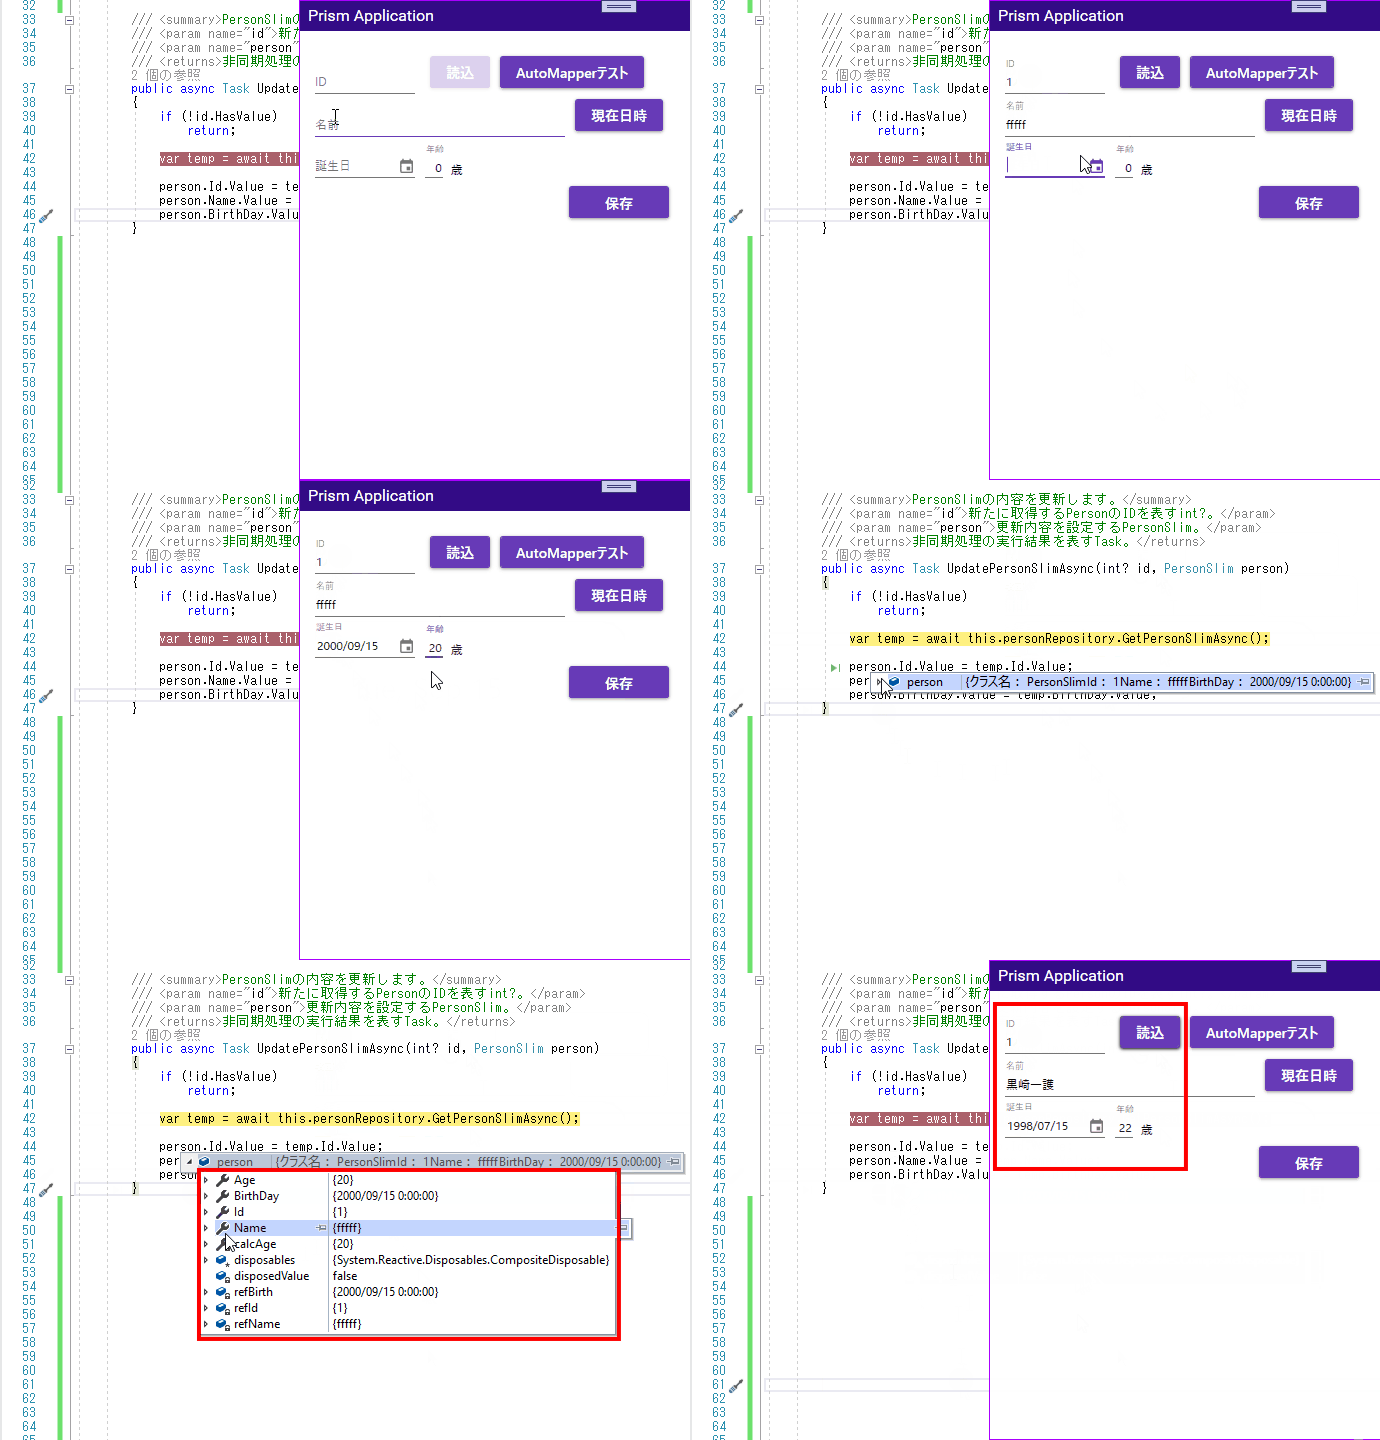
fig.7 person パラメータ
src. 12 の 19 行目にブレークポイントを張って person パラメータの内容を確認すると、fig. 7 の通り『Id』だけでなく他のプロパティも View で入力した値を保持している事が分かると思います。つまり View の入力値が即座に Model へ伝播するので VM で値を移し替える必要がありません。そのため、VM は単なる中継役に徹する事ができるようになり薄い層として作成できます。
又、person パラメータの内容確認後に再度実行すると src. 12 最下段の GetPersonSlimAsync から返す値に変わることも確認できます。
AutoMapper の利用
src. 12 の UpdatePersonSlimAsync メソッド内で、データアクセス層から受け取った値を UI 層から受け取った PersonSlim クラスに移し替えています。データの保存先が RDBMS の場合は WPF MVVM L@bo #5 で紹介したように Dapper 等の ORM を使用して値を取得する事も多いと思います。
又、前回も紹介した通り ReactivePropertySlim 型のプロパティを含むクラスはシリアライズ・デシリアライズできないので、データアクセス層では POCO なクラスを使う方が都合が良い場合が多いと思います。
そんな場合は『AutoMapper で ReactiveProperty にマッピング』で紹介した AutoMapper を使用して値の入れ替えを自動化することもできます。
AutoMapper を使用する場合は、src. 13 のようにデータアクセス層から POCO な PersonDto クラスを取得するように変更します。
1 2 3 4 5 6 7 8 9 10 11 12 13 14 15 16 17 18 19 20 21 22 23 24 25 26 27 28 29 30 31 32 33 34 35 36 37 38 39 40 41 42 43 44 45 46 47 48 49 50 51 52 53 54 | using System; using System.IO; using System.Threading.Tasks; namespace PrismSample { /// <summary>DataAccess層で生成される個人情報を表します。</summary> public class PersonDto { /// <summary>IDを取得・設定します。</summary> public int? Id { get; set; } = null; /// <summary>個人名を取得・設定します。</summary> public string Name { get; set; } = string.Empty; /// <summary>個人名のフリガナを取得・設定します</summary> public string Kana { get; set; } = string.Empty; /// <summary>誕生日を取得・設定します</summary> public DateTime? BirthDay { get; set; } = null; } /// <summary>Person用のリポジトリを表します。</summary> public class PersonRepository : IPersonRepository { /// <summary>PersonDtoをXMLファイルに保存します。</summary> /// <param name="person">保存するPersonDto。</param> /// <returns>非同期処理を表すTask。</returns> public async Task SavePersonAsync(PersonDto person) { var xmlPath = Path.Combine(SampleUtilities.GetExecutingPath(), "Bleach.xml"); await Task.Run(async () => { await SampleUtilities.XmlSerializeToFile<PersonDto>(xmlPath, person); }); } /// <summary>XMLファイルからPersonDtoを取得します。</summary> /// <returns>XMLファイルから取得したPersonDto。</returns> public Task<PersonDto> GetPersonDtoAsync() { var task = Task.Run(() => { var xmlPath = Path.Combine(SampleUtilities.GetExecutingPath(), "Bleach.xml"); return SampleUtilities.XmlDeserializedFromFileAsync<PersonDto>(xmlPath); }); return task; } ~ 略 ~ } } |
SampleUtilities から呼び出している 2 つのメソッドは XmlSerializer で XML ファイルへ保存・読込しているだけの単純なメソッドです。AutoMapper を使用すると値の移し替え部分は src. 14 のようになります。
1 2 3 4 5 6 7 8 9 10 11 12 13 14 15 16 17 18 19 20 21 22 23 24 25 26 27 28 29 30 31 32 33 34 | using System; using System.Diagnostics; using System.Threading.Tasks; using AutoMapper; namespace PrismSample { /// <summary>データI/O用のAgentを表します。</summary> public class DataAgent : IDataAgent { /// <summary>PersonSlimの内容を更新します。</summary> /// <param name="id">新たに取得するPersonのIDを表すint?。</param> /// <param name="person">更新内容を設定するPersonSlim。</param> /// <returns>非同期処理の実行結果を表すTask。</returns> public async Task UpdatePersonSlimAsync(int? id, PersonSlim person) { if (!id.HasValue) return; this.mapper.Map<PersonDto, PersonSlim>(await this.personRepository.GetPersonDtoAsync(), person); } /// <summary>PersonSlimをPersonDtoに移し替えてXMLファイルに保存します。</summary> /// <param name="person">XMLファイルに保存するPersonSlim。</param> /// <returns>非同期処理を表すTask。</returns> public async Task SavePersonSlimAsync(PersonSlim person) { var personDto = this.mapper.Map<PersonSlim, PersonDto>(person); await this.personRepository.SavePersonAsync(personDto); } ~ 略 ~ } } |
src. 14 のようにデータアクセス層で POCO なクラスを使用すればシリアライズもできますし、WPF MVVM L@bo #5 で紹介した SqlMapper を書く必要もありません。
ですが『AutoMapper で ReactiveProperty にマッピング』でも書いていますが、ここで紹介しているようなエンティティ系モデルの数が少ないアプリでは AutoMapper を導入しても省力化は見込めません。
逆に、エンティティ系モデルの数が多い場合や、プロパティ数の多いエンティティ系モデルをいくつも扱うアプリを作成する場合は導入を検討する価値はあると思います。
尚、このエントリで紹介しているサンプルのソリューションと『AutoMapper で ReactiveProperty にマッピング』で紹介しているサンプルのソリューションは共通なので、マッピング設定を書いた MapperConfiguration のソースコードは上の記事か GitHub リポジトリ を直接見てください。
AutoMapper は MVVM パターンのアプリを作成するのに必須ではなくあれば便利なユーティリティですが、この連載で紹介するサンプルアプリには使用します。
Model 用に Adapter を追加する
ここまで紹介した通り、Model ⇔ VM 間が双方向でバインドされていれば、Model のインタフェースには戻り値を返さないメソッドを用意すれば済みます。(非同期処理の Task 等は除く)
ですが、ここで紹介しているような単純なサンプルならともかく、複数のエンティティ系モデルをバインドするような画面の場合は Model と VM の間にもう 1 つクラスを用意した方が見通しが良くなる場合もあると思います。
Adapter を追加した場合の Model ⇔ VM 間
管理人の個人的な考えですが、Adapter パターンを使って各画面用の Adapter を作成する方法を考えてみました。例えば、src. 15 のような ReactiveSamplePanel 用の Adapter を Model(アプリケーションロジック層のプロジェクト)に作成します。
1 2 3 4 5 6 7 8 9 10 11 12 13 14 15 16 17 18 19 20 21 22 23 24 25 26 27 28 29 30 31 32 33 34 35 36 37 38 39 40 41 42 43 44 | using System.Threading.Tasks; using Prism.Ioc; namespace PrismSample { /// <summary>ReactiveSamplePanel用のAdapter</summary> public class ReactiveSamplePanelAdapter : IReactiveSamplePanelAdapter { /// <summary>ViewとバインドするPersonSlimを取得します。</summary> public PersonSlim Person { get; } /// <summary>PersonSlimを更新します。</summary> /// <returns>処理を実行するTask。</returns> public async Task UpdatePersonAsync() { using (var agent = this.container.Resolve<IDataAgent>()) { await agent.UpdatePersonSlimAsync(this.Person.Id.Value, this.Person); } } /// <summary>PersonSlimを保存します。</summary> /// <returns>処理を実行するTask。</returns> public async Task SavePersonAsync() { using (var agent = this.container.Resolve<IDataAgent>()) { await agent.SavePersonSlimAsync(this.Person); } } private IContainerProvider container = null; /// <summary>コンストラクタ。</summary> /// <param name="containerProvider">インスタンス取得用のDIコンテナを表すIContainerProvider。(DIコンテナからインジェクションされる)</param> /// <param name="personSlim">ViewとバインドするPersonSlim。(DIコンテナからインジェクションされる)</param> public ReactiveSamplePanelAdapter(IContainerProvider containerProvider, PersonSlim personSlim) { this.container = containerProvider; this.Person = personSlim; } ~ 略 ~ } } |
これまで VM に書いていた処理をまとめただけのクラスです。ポイントは Model に相当するアプリケーションロジック層のプロジェクトに置くクラスである点と、Viewとバインドするエンティティ系モデルをプロパティとして明示できる点です。つまり、Viewとバインドするエンティティ系モデルが増えた場合は Adapter にプロパティとして公開する形をとります。
Adapter を使用した VM
src. 15 の Adapter は src. 16 のように VM へインジェクションして Model ⇔ VM 間の双方向バインド先も変更します。
1 2 3 4 5 6 7 8 9 10 11 12 13 14 15 16 17 18 19 20 21 22 23 24 25 26 27 28 29 30 31 32 33 34 35 36 37 38 39 40 41 42 43 44 45 46 47 48 49 50 51 52 53 54 55 56 57 58 59 60 61 | using System; using System.Diagnostics; using System.Reactive.Disposables; using System.Reactive.Linq; using System.Threading.Tasks; using System.Windows.Input; using Prism.Ioc; using Prism.Mvvm; using Prism.Navigation; using Reactive.Bindings; using Reactive.Bindings.Extensions; namespace PrismSample.ReactiveMvvm { /// <summary>ReactivePropertyのデータバインディングサンプル用ViewModelを表します。</summary> public class ReactiveSamplePanelViewModel : BindableBase, IDestructible { ~ 略 ~ /// <summary>読込処理</summary> private async Task onLoadClick() => await this.adapter.UpdatePersonAsync(); private CompositeDisposable disposables = new CompositeDisposable(); private IReactiveSamplePanelAdapter adapter = null; private ReactivePropertySlim<bool> hasId; public ReactiveSamplePanelViewModel(IReactiveSamplePanelAdapter samplePanelAdapter) { this.adapter = samplePanelAdapter; this.adapter.AddTo(this.disposables); this.hasId = new ReactivePropertySlim<bool>(false) .AddTo(this.disposables); this.Id = this.adapter.Person.Id .ToReactivePropertySlimAsSynchronized(x => x.Value) .AddTo(this.disposables); this.Name = this.adapter.Person.Name .ToReactivePropertySlimAsSynchronized(x => x.Value) .AddTo(this.disposables); this.BirthDay = this.adapter.Person.BirthDay .ToReactivePropertySlimAsSynchronized(x => x.Value) .AddTo(this.disposables); this.Age = this.adapter.Person.Age .ToReadOnlyReactivePropertySlim() .AddTo(this.disposables); this.Id.Subscribe(v => this.hasId.Value = v.HasValue); this.LoadClick = this.hasId .ToAsyncReactiveCommand() .WithSubscribe(() => this.onLoadClick()) .AddTo(this.disposables); this.SaveButtonClick = new AsyncReactiveCommand() .WithSubscribe(async () => await this.adapter.SavePersonAsync()) .AddTo(this.disposables); } ~ 略 ~ } } |
基本的な流れは今まで紹介してきた内容と変わりませんが、VM にインジェクションするのは Adapter だけで済むようになり、メソッドもバインドするプロパティも全て Adapter を参照するように変わるので VM は Adapter に用意されるインタフェースだけ見れば良く、シンプルな構造になると思います。
とは言え、このサンプルアプリの場合では Adapter を作成すると手間が増えるだけであまり有用ではないと思いますが、View とバインドするエンティティ系モデルクラスが 2 つ、3 つ又はそれ以上になる場合は、Adapter にインジェクションするだけで済みます(VM 側のインジェクションは変更不要)。
加えて、Model ⇔ VM 間が双方向でバインドされていれば View の入力内容が Model に伝搬されるので Adapter に定義するメソッドにはパラメータも必要もありません。
Adapter を使用した場合でもサンプルアプリは fig. 8 のように動作します。
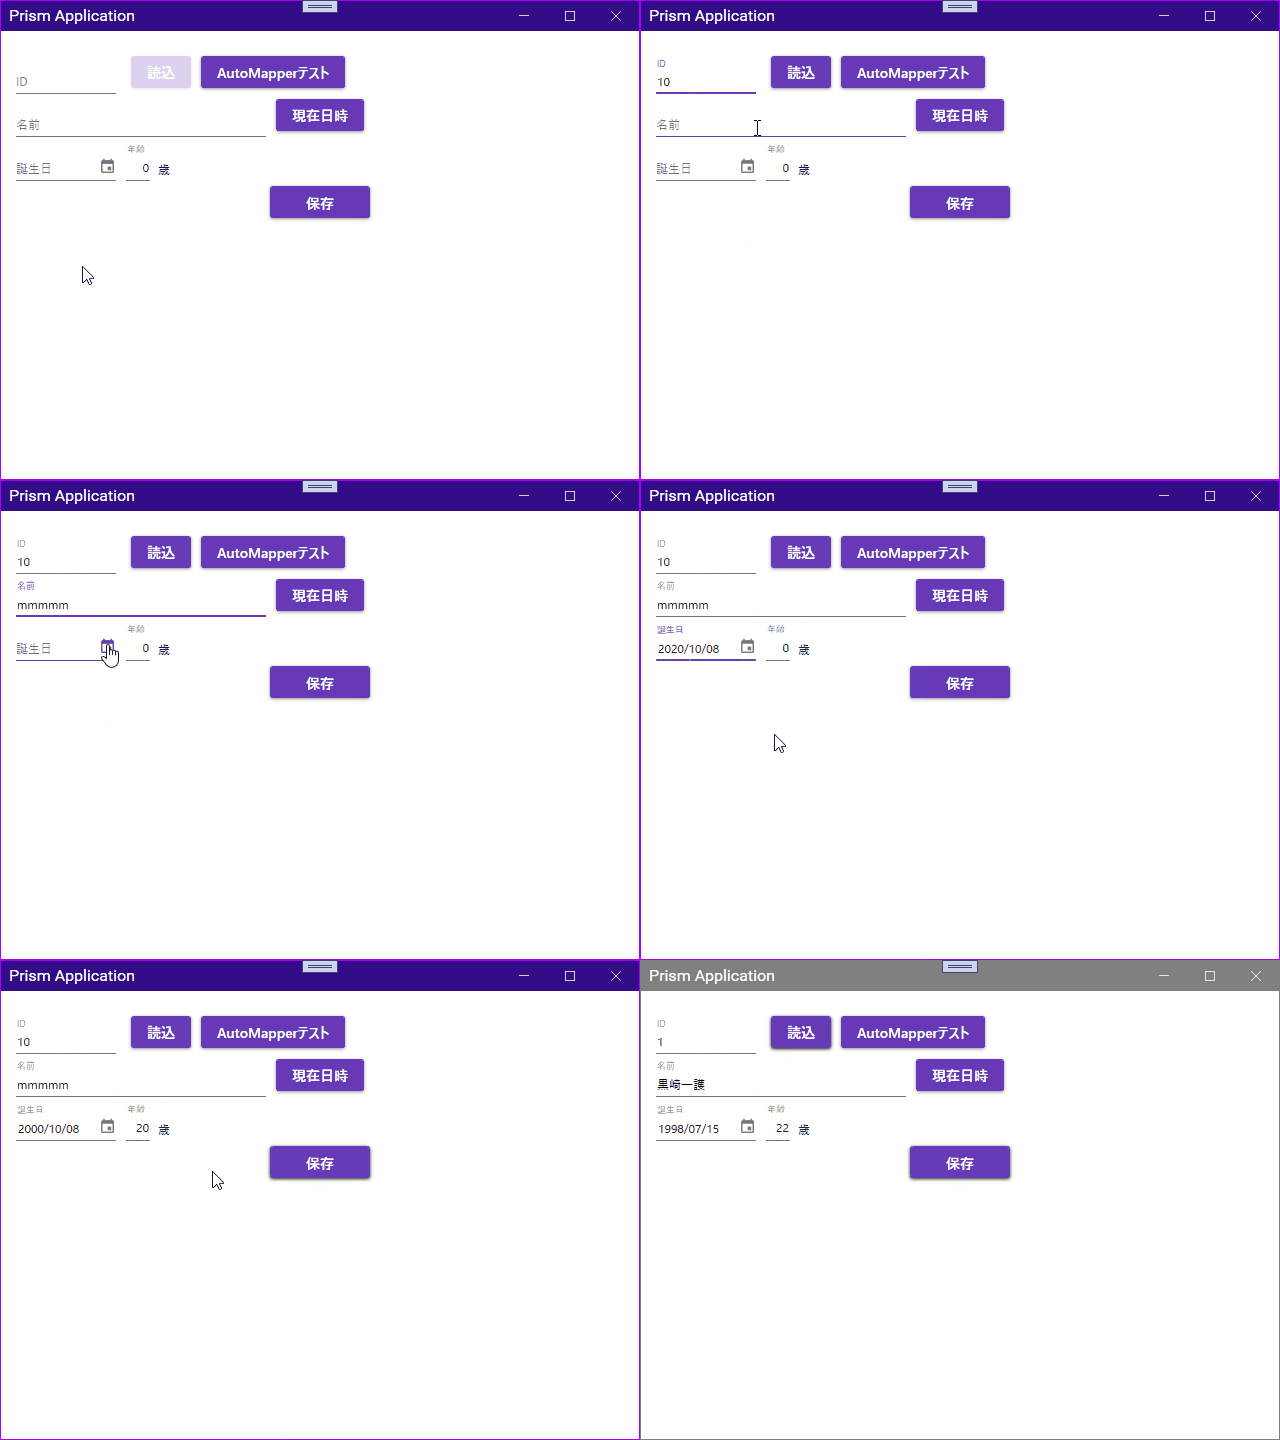
fig.8 Adapter を追加したサンプルアプリの動作
デモ用にデータの保存先・読込先になる XML を別ファイルにしたので、保存後でも以前のデータが読み込めるようになっていますが、Adapter を追加しても動作は変わりません。
fig. 8 で保存した内容は src. 17 のように XML ファイルに保存されます。
1 2 3 4 5 6 7 | <?xml version="1.0" encoding="utf-8"?> <PersonDto xmlns:xsi="http://www.w3.org/2001/XMLSchema-instance" xmlns:xsd="http://www.w3.org/2001/XMLSchema"> <Id>10</Id> <Name>mmmmm</Name> <Kana /> <BirthDay>2000-10-08T00:00:00</BirthDay> </PersonDto> |
管理人的に Adapter が有用だと思うのは特定の画面専用 Adapter として作成する点です。MVVM パターンで設計する場合の Model(アプリケーションロジック層)は View(UI 層)を意識しない設計にするのが基本だと思いますが、ユーザ要望等の都合からエンティティ系モデルに含めたくない画面固有の情報を取得したい場合もあると思います。
そのような場合に Adapter が間にあれば Adapter にバインド用にプロパティを追加する事もできる等、それなりに便利な場合も多いと思いますが、src. 15 のような Adapter は必須ではありませんし、あくまでも方法の 1 つです。
Adapter を作成する手間が増えるのは間違いないのでデメリットもあると思いますが、この連載では Model へ本章で紹介したような各 VM 用の Adapter を作成する方法で進めます。
まとめ的な
ここまで紹介した通り、Prism + ReactiveProperty を使用して MVVM パターンを適用した WPF アプリを作成するためのポイントは以下の 3 つです。
- Prism では View と VM は自動的に DI コンテナへ登録されるので、自分で作成する Model も DI コンテナへ登録してインジェクションされる構造で作成する
- Model 内のエンティティ系モデルのプロパティにも ReactivePropertySlim を使用して、Model ⇔ VM ⇔ View 間をそれぞれ双方向でバインドしてデータが連環する構造で作成する
- Model 内のコントローラー、サービス等の VM から呼び出すインタフェースになるメソッドは、戻り値を返すのではなく VM と双方向でバインドするエンティティ系モデルをパラメータに渡して Model 内部で値を設定する
上記 3 点に加えて補助的に Adapter パターンを適用する方法も紹介したので MVVM パターンで WPF アプリを作成するための Model のインタフェースは紹介できたと思います。後は ListBox 等のリスト系コントロールとバインドする方法の紹介が残っていますが、次回で紹介します。
次回紹介する ReactiveCollection は今まで紹介してきた単一値のバインドではなくリストとのバインドですが、基本的な考え方は今まで紹介してきた Model ⇔ VM 間の双方向バインドや Model のインタフェース等は変わらず、VM をどのように薄く作るかと言う点に注目して紹介したいと思っています。
尚、今回紹介したサンプルコードもいつもの通り GitHub リポジトリ に上げています。
次回記事「ReactiveCollection 世代の ListBox 達【step: 9 .NET 5 WPF MVVM ReactiveCollection 入門 2020】」


